Installing and configuring KVM on Red Hat Enterprise Linux 9 (RHEL 9)
Last Updated: March 22, 2024
Introduction –
The following packages need to install KVM virtualization on RHEL 9:
- libvirt: The libvirt virtualization library and management tool
- virt-install: A command-line tool for creating virtual machines
- libvirt-client: A package provides command-line client tools for managing libvirt-based virtualization environments.
- qemu-kvm: The QEMU emulator with KVM support
- qemu-img: A tool for manipulating disk images used by virtual machines
- libguestfs-tools: A set of tools for accessing and modifying virtual machine disk images
1
sudo dnf install libvirt virt-install libvirt-client qemu-kvm qemu-img libguestfs-tools -y
To check if the packages have been installed successfully, you can use the following command:
1
rpm -q qemu-kvm
The previous command should output something like qemu-kvm-7.0.0-13.el9_1.2.x86_64 if the hypervisor has been installed correctly.
To enable the KVM service at system startup and check the status, run:
1
2
sudo systemctl enable --now libvirtd
sudo systemctl status libvirtd
Finally, we will verify that KVM has been installed and that we can create and manage virtual machines:
1
sudo virt-host-validate
Installing Cockpit to manage KVM from a web interface
To manage KVM from a web interface, you can use Cockpit. Cockpit is a web-based interface for managing RHEL, including virtual machines. You can install Cockpit and the Cockpit virtual machine management interface by running the following commands:
1
2
sudo yum install cockpit cockpit-machines
sudo systemctl start cockpit
These commands will install and start the Cockpit service, allowing you to manage your KVM virtual machines through a user-friendly web interface.
Logging in to Cockpit
Now that cockpit has been installed, open your web browser of choice and enter the IP address of your server with port 9090, for example 10.0.1.10:9090 then login with your RHEL user credentials.
Configuring the virtual network
Before installing a virtual machine, it’s important to configure the virtual network to ensure proper connectivity. In this post, we’ll walk through the steps to create a virtual network in Cockpit.
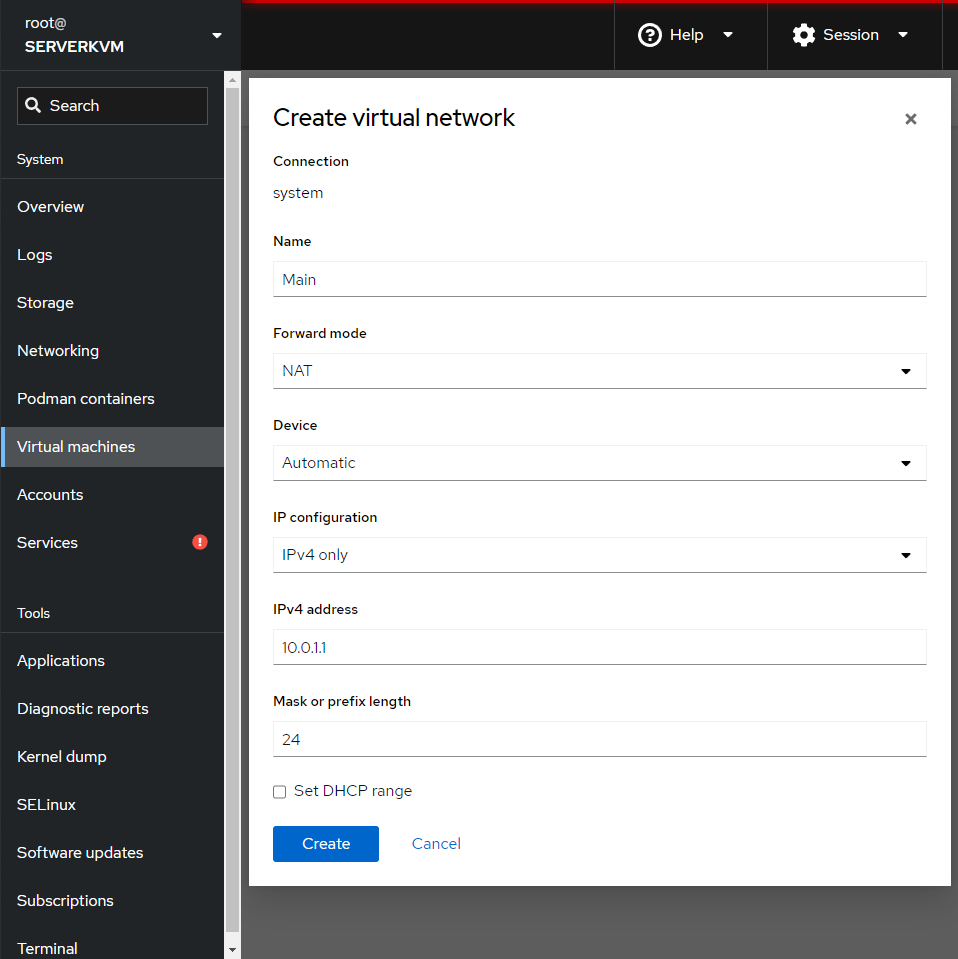
To get started, head to the Virtual Machines tab in Cockpit and select Network > Create virtual network.
Give your network a name and select the forward mode as NAT.
Selecting NAT as the network forward mode will allow the virtual machines to communicate with physical devices on the network, and vice versa. NAT stands for Network Address Translation, and it enables the virtual machines to share the host’s IP address, which allows them to access resources on the network.
For the Device, select Automatic unless your server has a specific network adapter that you wish to use.
In this example, we’ll be using the IPv4 address range of 10.0.1.1 with a /24 CIDR. This will allow for up to 256 IP addresses within the network.
Optionally, set the DHCP range.
Once you’ve entered all the necessary information, click Create. Your new virtual network should now appear in the list of available networks.
Install a virtual machine
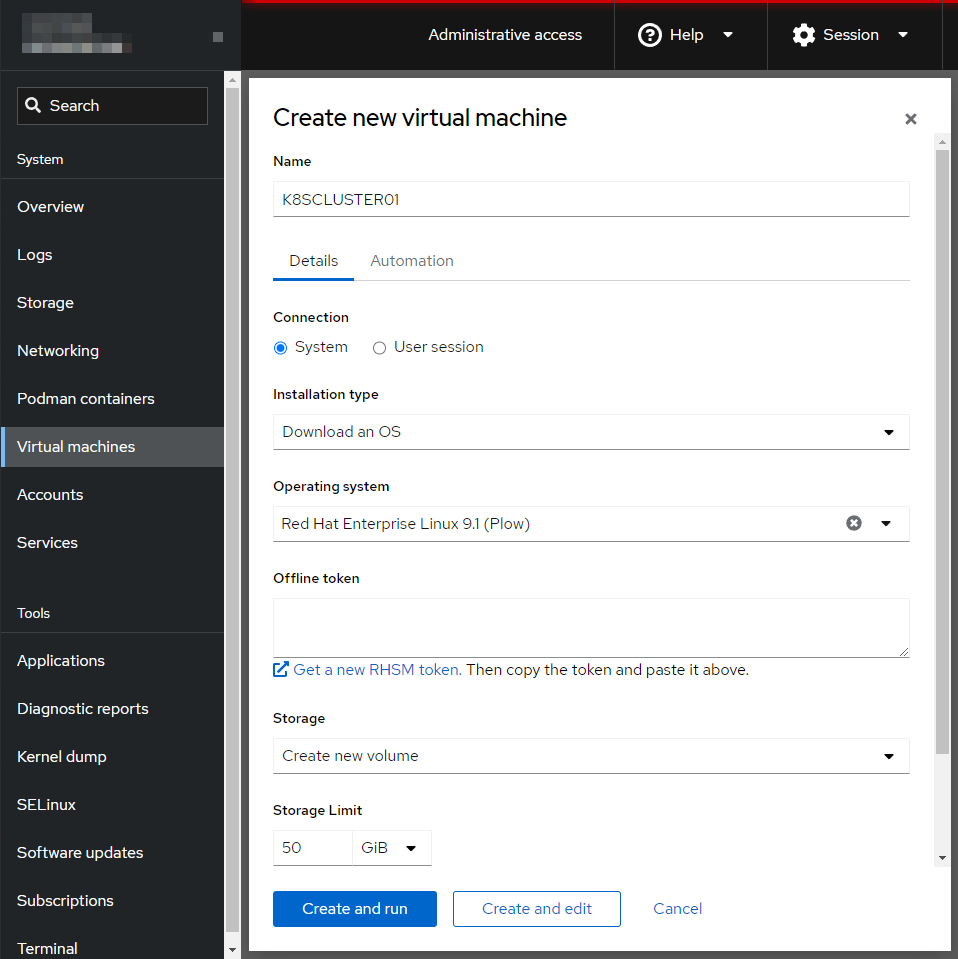
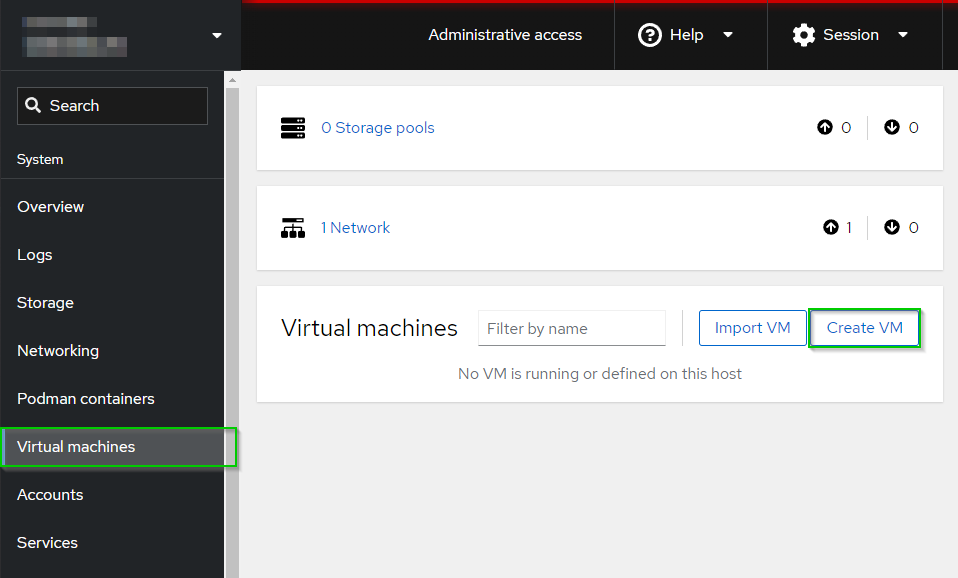 Select Virtual machines then select Create VM.
Set the hostname, OS installation type, Operating System, Storage, and Memory. Here is an example, where the virtual machine manager will automatically download and install the guest OS.
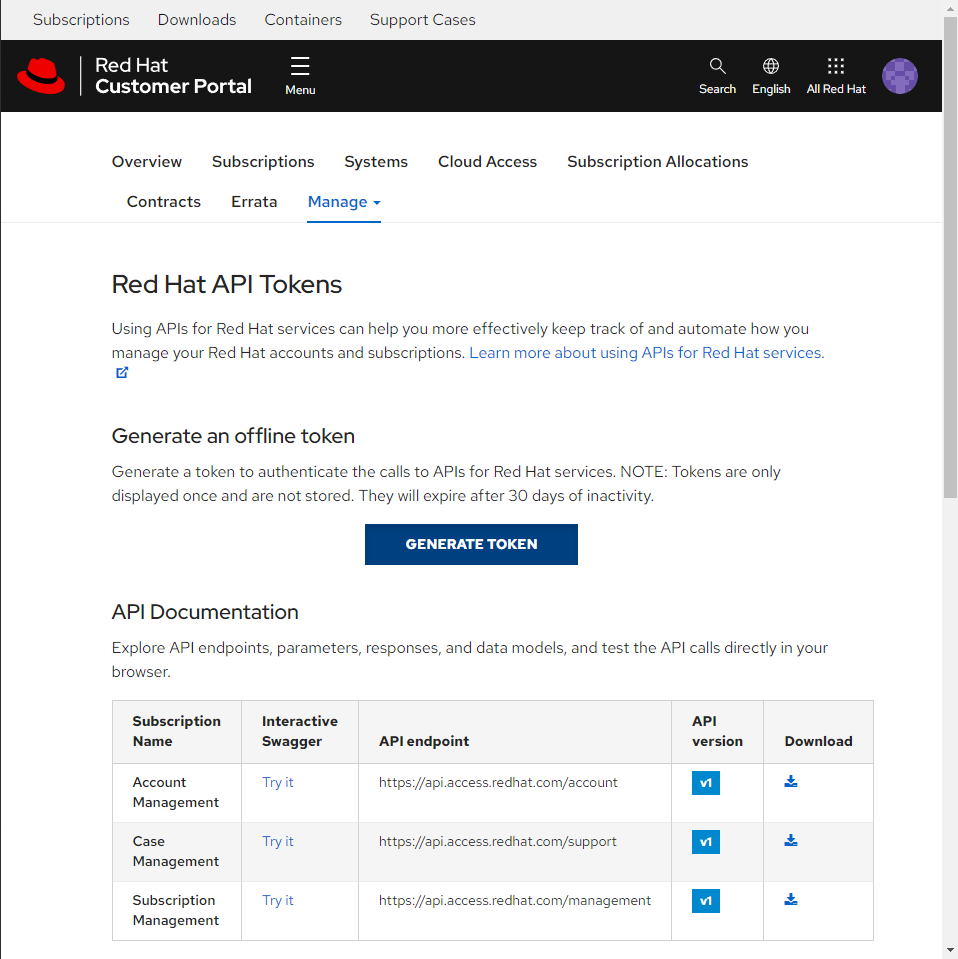
In order to automatically download the RHEL ISO, you must first generate an Offline token by clicking on Get a new RHSM token or going to https://access.redhat.com/management/api and logging in with your RHEL account.
Click Generate Token then click Copy to copy the token. Finally, go back to cockpit and paste in the token in the Offline token textbox.
Finally, click Create and edit to create the virtual machine and begin running it.
Managing Virtual Machines on KVM using Cockpit
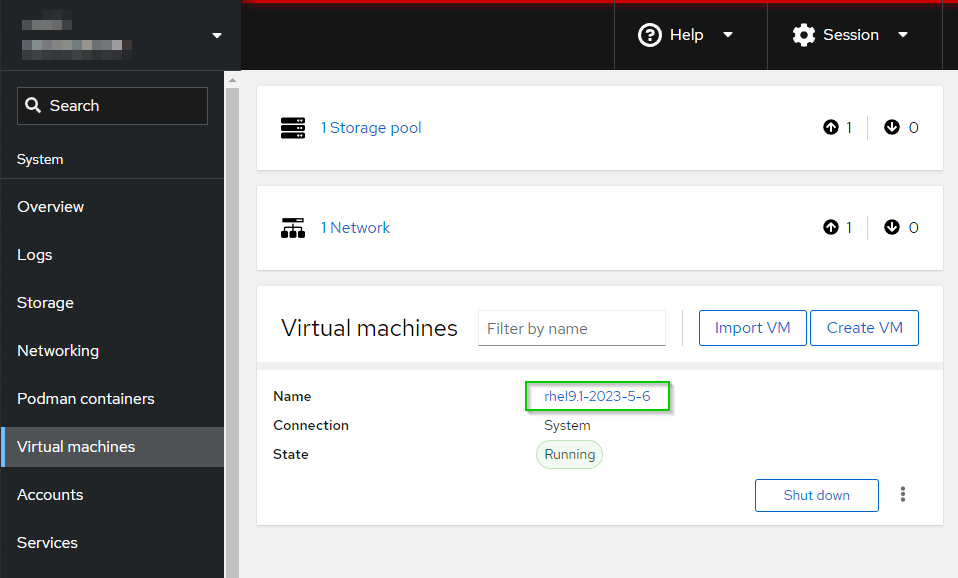
To manage virtual machines using Cockpit, navigate to the Virtual Machines tab and click on the name of the virtual machine you wish to manage.
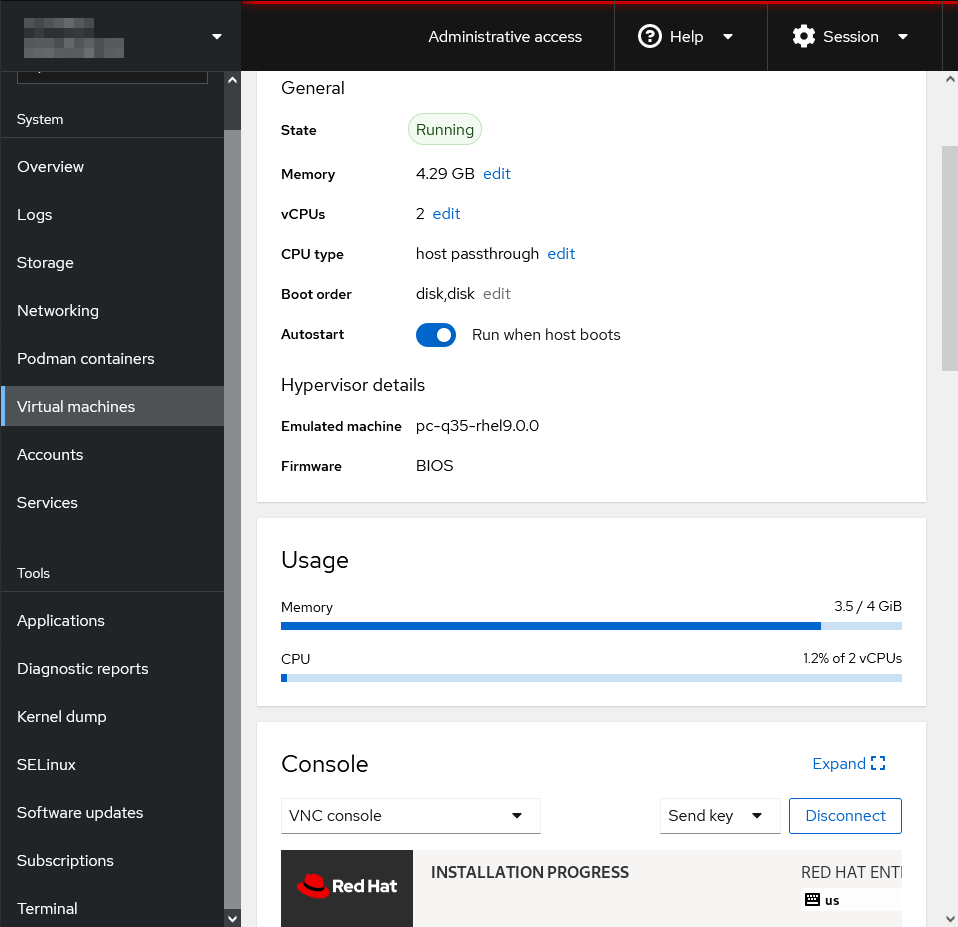
Here you will find an overview of the virtual machine, including its state, memory, virtual CPUs, and basic resource usage. You will also find a VNC console that acts as a virtual desktop in your web browser.
To ensure that the virtual machine boots safely, check the Run when host boots option next to the Autostart option.
If you need to modify the virtual machine’s resources, click Edit next to the resource you wish to change in this window:
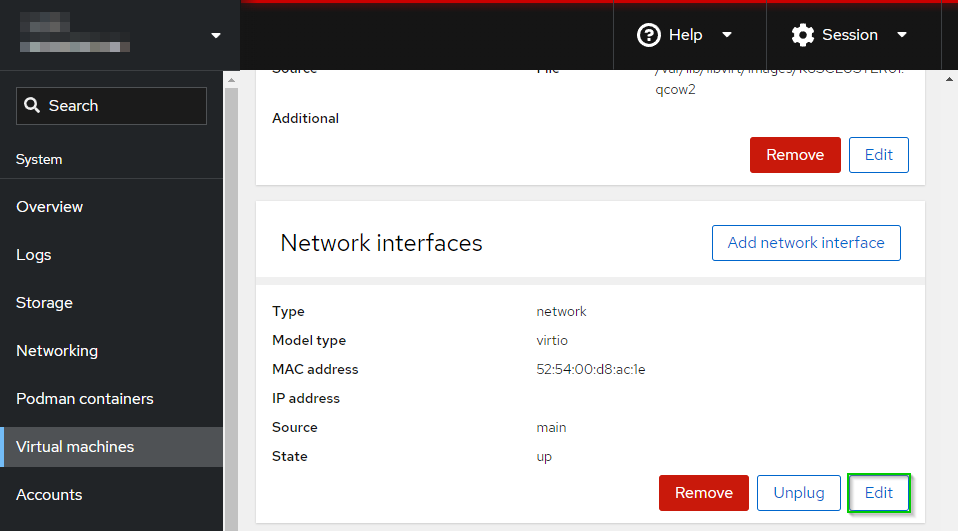
Since we create a custom virtual network in the previous step, scroll down to Network Interfaces and select Edit**
Now select the new custom virtual machine in the ** Source ** dropdown and click Save to continue.
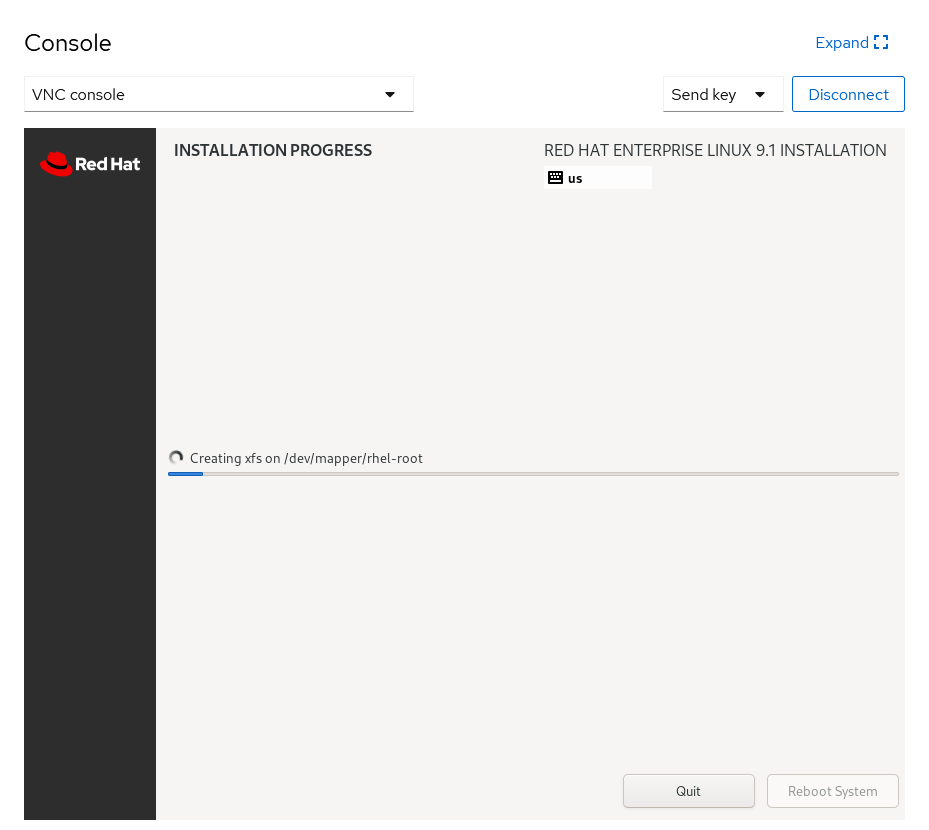
Use the VNC console to install the VM Operating System:
Creating a network bridge on the KVM host
To connect from the 10.0.0.1 network to the 10.0.1.1 network, you will need to set up some kind of routing or bridging. A network bridge will allow VM’s to access external networks.
One solution could be to set up a bridge on the KVM host that connects the virtual network (10.0.1.0) to the physical network (10.0.0.1). Here are the steps to do this using the new network manager in RHEL, nmcli.
1
2
3
4
5
sudo nmcli con add ifname br0 type bridge con-name br0
sudo nmcli con add type bridge-slave ifname eno1 master br0
sudo nmcli con modify br0 ipv4.addresses 10.0.0.3/24 ipv4.gateway 10.0.0.1 ipv4.method manual
sudo nmcli con modify br0 ipv4.dns "1.1.1.1"
sudo nmcli con up br0
You will receive confirmation messages that the bridge was added successfully:
1
2
3
Connection 'br0' (########-####-####-####-############) successfully added.
Connection 'bridge-slave-eno1' (########-####-####-####-############) successfully addded.
Connection successfully activated (master waiting for slaves) (D-Bus active path: /org/freedesktop/NetworkManager/ActiveConnection/21)
In Cockpit make sure to set the following on the new bridge:
- Check “Connect automatically”
- Disable IPV6
- Select Add member and add eno1 to Interface members
Configure RHEL virtual machine network adapter
Run the command nmcli con show to display a list of available network connections.
Identify the network connection you want to configure with a static IP address, and note the name of the connection. For example, let’s assume the name of the connection is ens01.
Run the following command to set a static IP address for the ens33 connection, replacing the IP information with your own:
1
2
3
4
nmcli con mod ens33 ipv4.addresses 10.0.0.200/24 ipv4.gateway 10.0.0.1 ipv4.dns 1.1.1.1
nmcli con mod ens33 ipv4.method manual
nmcli con down ens33 && nmcli con up ens33
nmcli con show ens33
Managing KVM and virtual machines from the command line
For the next section of this article, I walk through various tasks associated with managing KVM virtual machines (VMs) and virtual networks, using the command-line tools virt-install, virsh, and virt-clone. Our examples will use a hypothetical VM named myVM and a virtual network named main-network. Substitute these with your actual VM and network names as required.
Creating a virtual machine
We start by creating a VM using the virt-install command:
1
sudo virt-install --name=myVM --vcpus=2 --memory=2048 --location=/var/lib/libvirt/images/rhel9.iso --disk path=/var/lib/libvirt/images/rhel9.qcow2,size=20 --nographics --os-variant=rhel9.2 --initrd-inject=/var/lib/libvirt/images/ks.cfg --extra-args="inst.ks=file:/ks.cfg console=ttyS0,115200n8"
This command will create a new VM named myVM with 2GB of RAM, 2 vCPUs, a 20GB disk, and a graphical interface accessible via VNC.
Creating a virtual machine from a mounted directory
To use SELinux to allow execution of a specific directory, you can use the chcon command to change the SELinux context of the directory. Here’s how you can do it:
- Check the current SELinux context: Before making any changes, it’s a good practice to check the current SELinux context of the directory. You can use the
ls -Zcommand to display the SELinux context of the directory. For example:1
ls -Z /mnt/images
This command will show the current SELinux context of the directory.
- Set the correct SELinux context: To allow execution of the directory, you need to set the appropriate SELinux context. The exact context depends on the intended use of the directory. For example, if the directory contains executables that should be allowed to run, you can use the
bin_tcontext. Use the following command to change the SELinux context:1
sudo chcon -R -t bin_t /mnt/images
Replace /mnt/images with the actual path to the directory you want to allow execution for. The -R option is used to recursively change the context for all files and subdirectories within the specified directory.
- Verify the SELinux context: After changing the SELinux context, you can use the
ls -Zcommand again to verify that the context has been updated to the desired value.1
ls -Z /path/to/directory
Make sure that the SELinux context is now set to the desired type, such as bin_t.
By setting the appropriate SELinux context, you allow the directory and its contents to execute according to the SELinux policy rules. Keep in mind that modifying SELinux contexts should be done carefully and with an understanding of the security implications. It’s recommended to consult the official SELinux documentation or seek assistance from an expert if you have specific requirements or concerns related to SELinux configuration.
Viewing Virtual Machine Status
To get a status report of all VMs, use the virsh list --all command:
1
sudo virsh list --all
This will display all your VMs along with their current status (e.g., running, paused, or shut down).
Creating a Virtual Network
You can create a virtual network for your KVM VMs using the virsh command. Begin by creating a network definition file in XML format:
1
2
3
4
5
6
7
<network>
  <name>main-network</name>
  <bridge name='virbr0' stp='on' delay='0'/>
  <mac address='52:54:00:8a:23:48'/>
  <ip address='10.0.0.1' netmask='255.255.255.0'>
  </ip>
</network>
Save the above XML content into a file, say, network-definition.xml. This network is named main-network, uses the virbr0 bridge, has a MAC address of 52:54:00:8a:23:48, and an IP address of 10.0.0.1.
Define and start your new network with:
1
2
3
virsh net-define --file /path/to/network-definition.xml
virsh net-start main-network
virsh net-autostart main-network
This series of commands will define, start the network, and set it to autostart with the system boot.
Cloning a Virtual Machine
Clone an existing VM using the virt-clone command:
1
2
virsh list --all
virt-clone --original source_vm --name new_vm --auto-clone
Please note, the source VM should be shut down before cloning. The --auto-clone option generates a new UUID and MAC address for the clone.
Managing VM Snapshots
Creating, listing, and reverting snapshots are straightforward operations:
Create a Snapshot:
1
virsh snapshot-create-as --domain myVM --name mySnapshot
List Snapshots:
1
virsh snapshot-list myVM
Revert to a Snapshot:
1
virsh snapshot-revert myVM mySnapshot
These commands create, list, and revert snapshots for myVM, respectively. Replace mySnapshot with your desired snapshot name.
You now have a good grasp of how to manage virtual machines and networks in KVM using command-line tools. For more information on managing virtual machines with virsh, refer to the man page (man virsh).
Conclusion
In conclusion, KVM virtualization on Red Hat Enterprise Linux 9 (RHEL 9) is a powerful and flexible option that provides efficient management of virtual environments. In this tutorial, we’ve walked through the process of installing and configuring KVM on RHEL 9, as well as how to use Cockpit to manage virtual machines through a web interface.
Using Cockpit, you can easily create virtual networks, allowing you to configure and manage virtual machines more efficiently. We hope that this guide has been useful and helps you to get started with KVM on RHEL 9. If you have any questions or feedback, please feel free to reach out to me. Thank you for reading!
Featured Tweet
Read this step-by-step tutorial on how to install and configure KVM on Red Hat Enterprise Linux 9 (RHEL 9)https://t.co/sVvAR8kv83#rhel #kvm #virtio #cockpit #bash #virtualmachines #virtualization #hypervisor #homelab #sysadmin
— rcdevops (@rcdevops) March 22, 2024
