Setting Up Perforce Helix Core Server on CentOS or Red Hat Enterprise Linux
Last Updated: January 7, 2025
Introduction–
In today’s world, version control systems are an indispensable tool for any development team. Perforce Helix Core is one of those powerful version control systems that can make your life easier. If you are running a CentOS or Red Hat Enterprise Linux (RHEL) system and wish to install Perforce Helix Core Server, you’ve come to the right place. This article will walk you through the step-by-step process to get your Perforce server up and running.
Recommended System Requirements
Before starting the installation process, ensure your system meets the following specifications:
- CPU: 2 core
- Memory: 8GB
- Storage:
- Disk 1: SSD
- Partition 1: $P4ROOT (Metadata)
- Filesystem: ext4 or xfs (Linux), NTFS (Windows)
- Recommended size: Based on your project’s specific needs, probably 64GB+
- Partition 2: $P4LOG (Logs)
- Filesystem: ext4 or xfs (Linux), NTFS (Windows)
- Recommended size: At least 20GB
- Partition 1: $P4ROOT (Metadata)
- Disk 2: SSD
- Partition 1: $P4JOURNAL (Journal)
- Filesystem: ext4 or xfs (Linux), NTFS (Windows)
- Recommended size: At least as large as your largest database table, preferably more. 64GB - 128GB would be appropriate.
- Partition 1: $P4JOURNAL (Journal)
- Disk 3: HDD
- Partition 1: Versioned Files (depot)
- Filesystem: ext4 or xfs (Linux), NTFS (Windows)
- Recommended size: Based on your project’s specific needs, generally the largest of all. Probably at least 1TB.
- Partition 1: Versioned Files (depot)
- Disk 1: SSD
Having separate disks can greatly improve performance and make backup procedures more manageable.
For optimal server performance, consider using high-end SSDs like the Samsung 870 EVO SSD or the Samsung 990 PRO SSD for your $P4ROOT and $P4JOURNAL partitions.
For depot storage, the Seagate IronWolf 12TB NAS offers great capacity and durability
Installation Steps
Embarking on setting up Perforce Helix Core Server involves a series of meticulous steps that tap into various Linux server management skills, from configuring repositories and firewalls to optimizing storage solutions. These steps are crucial for establishing a robust version control environment on your CentOS or RHEL system.
Importing Perforce Public Key
The first step is to import Perforce’s packaging key into your system’s RPM keyring. Execute the following command:
1
sudo rpm --import https://package.perforce.com/perforce.pubkey
Adding Perforce Repository to YUM Configuration
Next, you need to add Perforce’s YUM repository to your system’s repository list. Create a new repository file under /etc/yum.repos.d/:
1
sudo vi /etc/yum.repos.d/perforce.repo
Insert the following content into the file:
1
2
3
4
5
[perforce]
name=Perforce
baseurl=http://package.perforce.com/yum/rhel/9/x86_64
enabled=1
gpgcheck=1
Installing Perforce Helix Core Server Package
Now that the repository is set up, you can proceed with the installation of the helix-p4d package. Run the following command:
1
sudo yum install helix-p4d -y
Configure Linux / CentOS firewall to allow traffic P4PORT (1666):
Configuring your Linux or CentOS firewall to permit traffic through P4PORT (1666) is a key step in setting up Perforce Helix Core Server, ensuring it communicates effectively with client machines.
Check Current Firewall Status:
- Check if the firewall is active:
1
sudo firewall-cmd --state
- This command will tell you if the firewall is running.
Add a Rule to Allow Traffic on Port 1666:
- Add a firewall rule:
1
sudo firewall-cmd --permanent --add-port=1666/tcp
- This command adds a rule allowing incoming traffic on port 1666 over TCP, which is what Perforce uses.
Reload the Firewall to Apply Changes:
- Reload the firewall:
1
sudo firewall-cmd --reload
- This applies the changes you’ve made to the firewall configuration.
Verify the New Rule:
- Check the updated rules:
1
sudo firewall-cmd --list-all
- This will show all the rules currently in effect, including the one you just added for port 1666.
Notes:
- Persistence: The
--permanentflag in thefirewall-cmdcommand ensures that the rule persists across reboots. Without this, the rule would only apply to the current session. - Security Considerations: Opening ports on your firewall involves potential security risks. Ensure that only necessary ports are open and consider implementing additional security measures, such as using Perforce’s built-in security features, restricting IP addresses that can connect, and using VPNs or SSH tunnels for connecting to the server.
- SELinux: If you’re running SELinux in enforcing mode, you may also need to adjust SELinux policies to allow Perforce to operate on the port.
By following these steps, you should be able to configure your CentOS firewall to allow traffic to the Perforce server, enabling users to connect from other machines. Always test after making changes to ensure that everything is working as expected and that the server is accessible.
After modifying the firewall settings, considering an additional layer of security with a hardware firewall like the FORTINET FortiGate 40F might be wise for enhanced protection and network management, especially in larger or more complex network environments.
Configuring Linux Storage for Optimal Perforce Helix Core
To set up your two extra disks for Perforce Helix Core as described in the article, you’ll need to partition and format them, then configure Perforce to use these partitions for specific purposes. You can skip to the next section, Configuring the Perforce Service, if you already have your driver partitioned.
Why and How This Works:
Note: You can skip to the next section,
- Partitioning: Partitioning allows you to divide your physical disks into isolated sections. Each partition functions as a separate disk, which means you can format them with different file systems and mount them separately. This isolation can improve performance and management.
- Filesystems: Creating a filesystem like
ext4on these partitions prepares them to store files.ext4is a widely used, robust filesystem that provides excellent performance and features. - Mounting: Mounting attaches the filesystems you’ve created to a specific directory in your Linux file tree. This process makes the storage available for use.
- Permanent Mounts in
/etc/fstab: This ensures that your partitions are mounted automatically at every boot, maintaining the necessary setup for Perforce without manual intervention. - Perforce Configuration: Finally, telling Perforce to use these paths aligns the application with your optimized disk setup. Using separate disks for different data types ($P4JOURNAL, depots) improves performance and reliability. The journal, which records all changes, is write-intensive and benefits from an SSD’s speed, while the depot storage, which is usually larger, should reside on the slower, larger HDD for optimal space and cost efficiency.
By following these steps, you are optimizing the performance and reliability of your Perforce Helix Core Server by ensuring that it utilizes the disk resources efficiently and effectively.
Here’s a breakdown of the steps and commands you’ll need to follow:
1. Identifying the Drives:
First, you need to identify the disks attached to your VM. You can do this by running:
1
lsblk
This command lists all the block devices attached to your system. Your new disks should appear here without any mount points.
2. Partitioning the Drives:
You need to partition both disks. You can use fdisk or parted for this purpose. For simplicity, I’ll demonstrate using fdisk. Replace the drive letters with your actual disk letter.
For Disk 1(SSD for $P4ROOT): This drive should be setup either on the OS drive or a dedicated SSD.
1
sudo fdisk /dev/sdb
For Disk 2 (SSD for $P4JOURNAL):
1
sudo fdisk /dev/sdc
For Disk 3 (HDD for depot):
1
sudo fdisk /dev/sdd
Within fdisk, you’ll create a new primary partition on each disk by following the prompts (usually by pressing n for new partition, then p for primary, followed by accepting default values), and w to write the changes and exit fdisk.
3. Creating Filesystems:
Once partitioned, you need to create filesystems on these partitions.
For the $P4JOURNAL partition on Disk 2:
1
sudo mkfs.ext4 /dev/sdb1
For the $P4JOURNAL partition on Disk 2:
1
sudo mkfs.ext4 /dev/sdc1
For the Versioned Files (depot) partition on Disk 3:
1
sudo mkfs.ext4 /dev/sdd1
4. Mounting the Partitions:
Create mount points and mount these partitions.
1
2
3
4
5
6
7
sudo mkdir /perforce
sudo mkdir /p4depots
sudo mkdir /p4journal

sudo mount /dev/sdb1 /perforce
sudo mount /dev/sdc1 /p4depots
sudo mount /dev/sdd1 /p4journal
5. Making the Mounts Permanent:
To ensure these partitions are mounted automatically at boot, add them to /etc/fstab.
1
2
3
4
5
6
sudo vi /etc/fstab

# Once the file is open, add the following lines to the end of the file:
/dev/sdb1 /perforce ext4 defaults 0 0
/dev/sdc1 /p4depots ext4 defaults 0 0
/dev/sdd1 /p4journal ext4 defaults 0 0
6. Set Permissions on the Depots Directory:
We need to ensure that the Perforce server has read, write, and execute permissions for the /p4depots directory and all its subdirectories.
In our environment, the Perforce server (p4d) process is running under the user perforce. This means we need to ensure that the perforce user has the necessary permissions on the /p4depots directory to perform operations such as creating directories, writing files, etc. You can check which user is running the perforce service with: ps aux | grep p4d – Note the perforce user and group should be created automatically when helix core is installed.
- Change Ownership of the Directory: Ensure the
perforceuser and group owns the/p4depotsdirectory.1 2 3
sudo chown -R perforce:perforce /perforce sudo chown -R perforce:perforce /p4depots sudo chown -R perforce:perforce /p4journal
- Set the Proper Permissions: Grant full read, write, and execute permissions to the owner (which is now the
perforceuser).1 2 3
sudo chmod -R 755 /perforce sudo chmod -R 755 /p4depots sudo chmod -R 755 /p4journal
Configuring the Perforce Service
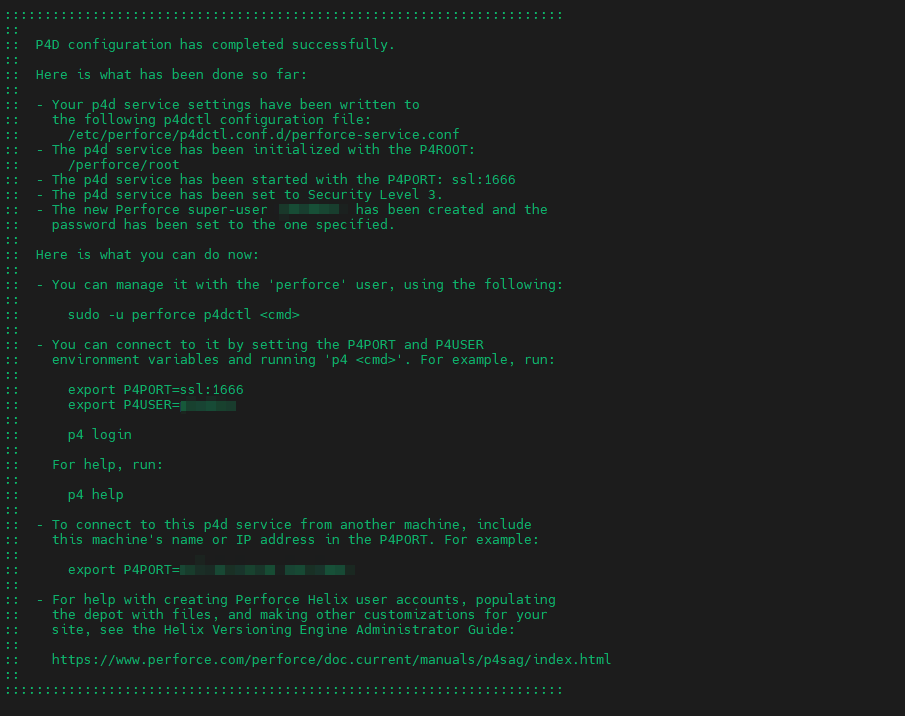
The package is now installed and are disks are paritioned, but additional configuration is required. Execute the following script, which will launch an interactive setup process:
1
sudo /opt/perforce/sbin/configure-helix-p4d.sh
This script will walk you through various configuration steps. Follow the on-screen instructions to complete the setup.
Perforce Service name [master]: p4d
- Description: This is the identifier for starting/stopping the service and distinguishing this server from others.
Perforce Server root (P4ROOT) [/opt/perforce/servers/perforce-service]: /perforce
- Description: Directory where versioned files and metadata are stored.
Perforce Server unicode-mode (y/n) [n]: y
- Description: Determines if the server will support Unicode, which will handle file names and text data in any language. This is irreversible once set. This depends entirely on if you need to use non-English characters or need to support internationalization.
Perforce Server case-sensitive (y/n) [y]: y
- Description: Determines if the server will be case sensitive. Select Yes for most cases.
Perforce Server address (P4PORT) [ssl:1666]: ssl:1666
- Description: Host and port where the server listens, and the communication protocol. Keep the default suggestion unless you have a specific reason to change it.
Perforce super-user login [super]: perforceadmin
- Description: User ID for a new user to be created with super-level privileges.
Perforce super-user password: [Enter a strong password].
- Description: Password for the superuser. It should be strong as this user has unlimited privileges.
Once you’ve filled out each prompt, your Perforce Helix Core server will be finely tuned and ready for efficient version control operations.
Completing Configuration for Perforce Paths:
After successfully completing the setup script, it’s crucial to fine-tune Perforce Helix Core to utilize these paths effectively, ensuring a seamless and optimized experience. Follow these steps to configure the new paths:
- Setting $P4JOURNAL Location:
- Action: Assign the $P4JOURNAL environment variable to the newly created SSD partition.
- Description: This specifies the path for the Perforce journal file, which logs all changes to the server’s database for recovery and auditing purposes. Placing it on a a seperate SSD enhances the server’s ability to quickly record and access change logs.
- Command:
1
export P4JOURNAL=/p4journal/journal
- Update default depot location
- Action: Update the default depot location to use the 1TB HDD depot disk.
- Descrtipion: Use the
p4 depotcommand to edit the default depot configuration file. We will update the default depot to point to /p4depots directory. Note that if we want to use a custom location (outside of the the P4ROOT drive, like our 1TB storage HDD) we need to set a new depot location every time a new depot is created.1
p4 depot depot
1
Map:    /p4depots/depot/...
- Verifying Configuration:
- Action: Check the settings to ensure they’re correctly implemented.
- Description: The
p4 info,p4 depots, andecho $P4JOURNALcommands return information about the server’s current state, the list of depots, and list the P4JOURNAL location. Verify that the output reflects your new configurations for peace of mind and troubleshooting purposes. - Command:
1
2
3
p4 info
p4 depots
echo $P4JOURNAL
- Creating Backup Schedule:
- Action: Plan regular backups of the $P4ROOT, $P4JOURNAL, and depot directories.
- Description: Regular backups are crucial for disaster recovery and ensuring the safety of your data. Consider tools like
cronjobs for scheduling and scripts for automated backups.
By meticulously configuring each path and ensuring all settings are properly applied, your Perforce Helix Core Server is not just up and running but is also optimized for high performance, reliability, and smooth operation. This preparation is key to supporting the demanding workflows of modern development environments, especially in complex projects such as game development with UE5.
Installing and Connecting to P4V and Managing User Accounts
Now that your Perforce Helix Core server is up and running, let’s discuss how to connect to it using P4V on Windows 10 or 11, and how to manage user accounts effectively.
Install and connect to P4V:
- Download and Install P4V: Download Helix Core Apps, which contains P4V, from the Perforce website to install it on your Windows system.
- Install P4V:
When the Helix Core Apps installer launches, select all four Helix VCS client applications and click
Nextto continue.
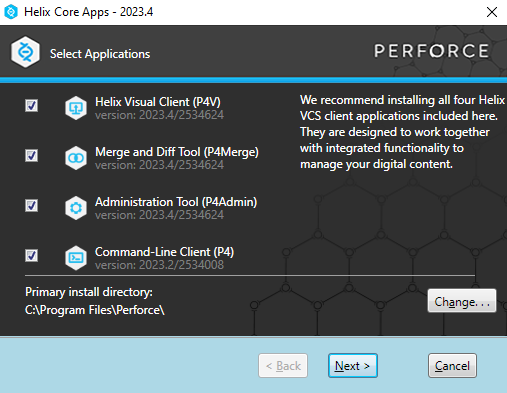
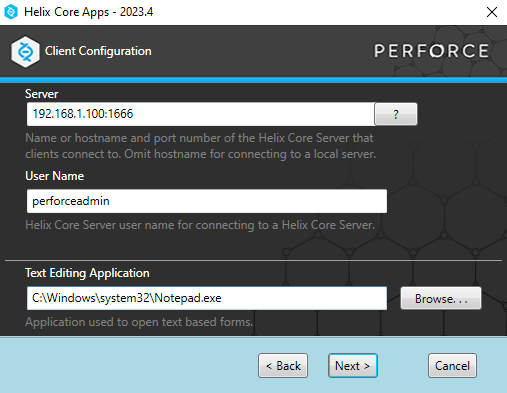
In the ‘Server’ field, enter your server’s IP address and port in the formathostname:port(e.g.,192.168.1.100:1666). Enter your perforce admin username in the ‘User Name’ field.
We will create unique users with lower levels of privileges later. ClickNextto continue.
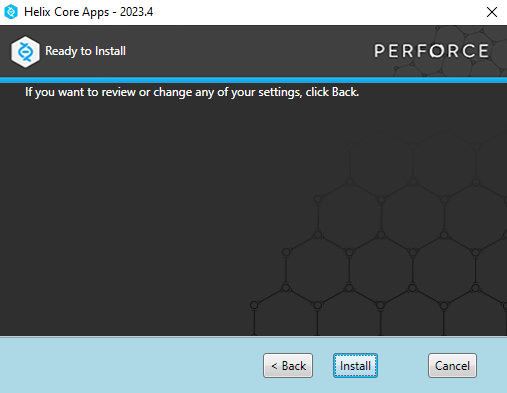
ClickInstallto begin the installation process.
Wait for the installation to complete and clickExit.

- Test the Connection:
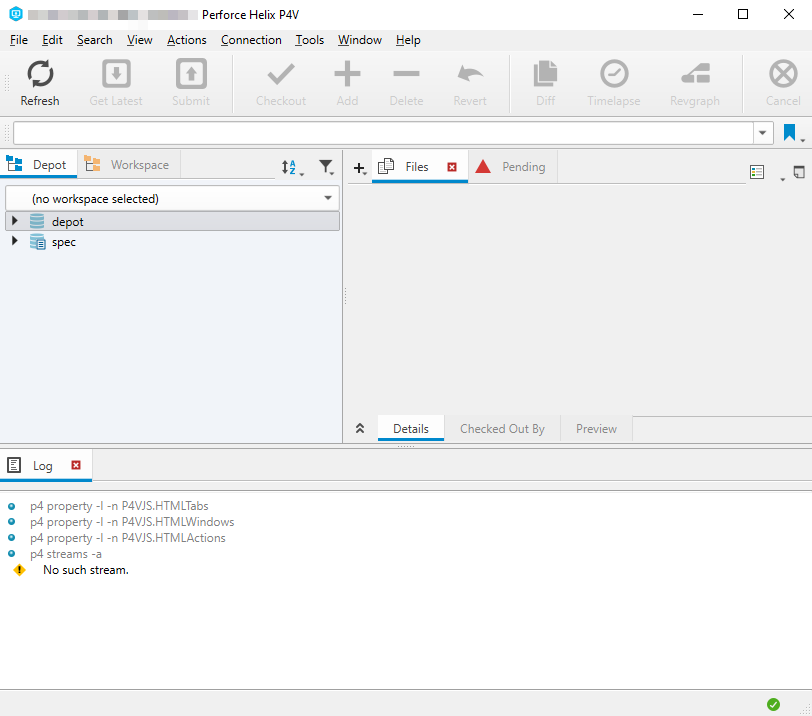
The P4V console should launch automatically (if it doesn’t, search for P4V in Windows search and select P4V). Verify that the
ServerandUserinformation are correct then clickOK. Note that you may need to prefix your Perforce Helix Core server IP Address withssl:, for example:ssl:192.168.1.100:1666. If you are prompted to
 Choose Character Encoding, select the character encoding (example:Unicode (UTF-8)which is good for working with multiple languages) and selectOK. Next, enter your perforce admin password and clickOK.
If everything was setup correctly, you will be logged in to P4V and be able to use Helix Core as your version control software.
Managing User Accounts
Individual User Accounts
It’s a best practice for each team member to have their own Perforce account. This ensures accountability, provides individual workspace management, and allows for precise permission control.
Creating New Accounts
- Through P4V: If you have admin privileges, you can create new users directly in P4V under the ‘Administration’ tool in the ‘Users’ tab.
- Connect to the P4V app using your perforce admin account, as outlined earlier.
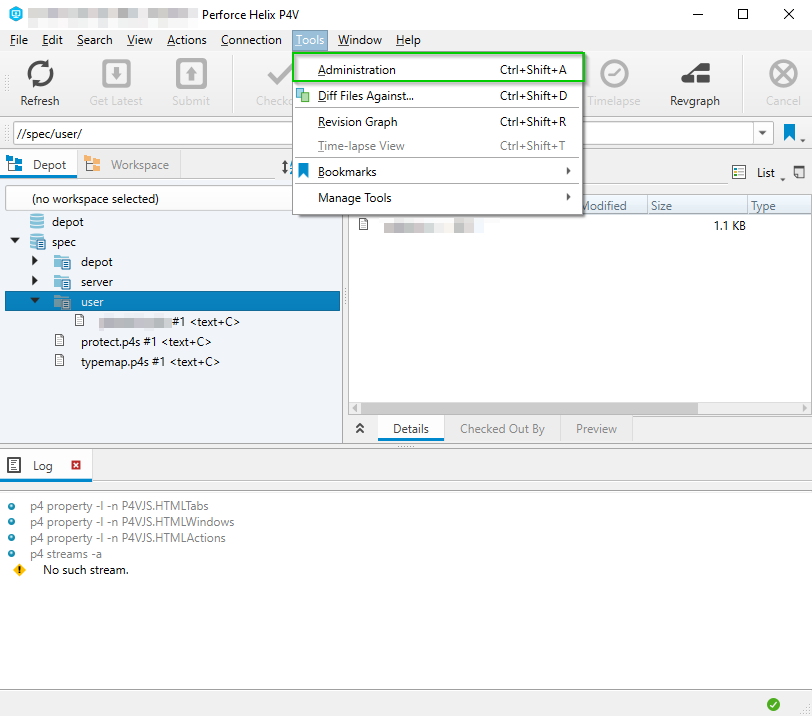
- Click on Tools -> Administration.
- Click on the purple
User+icon, or select theUsers & Groupstab, right-click and selectNew User.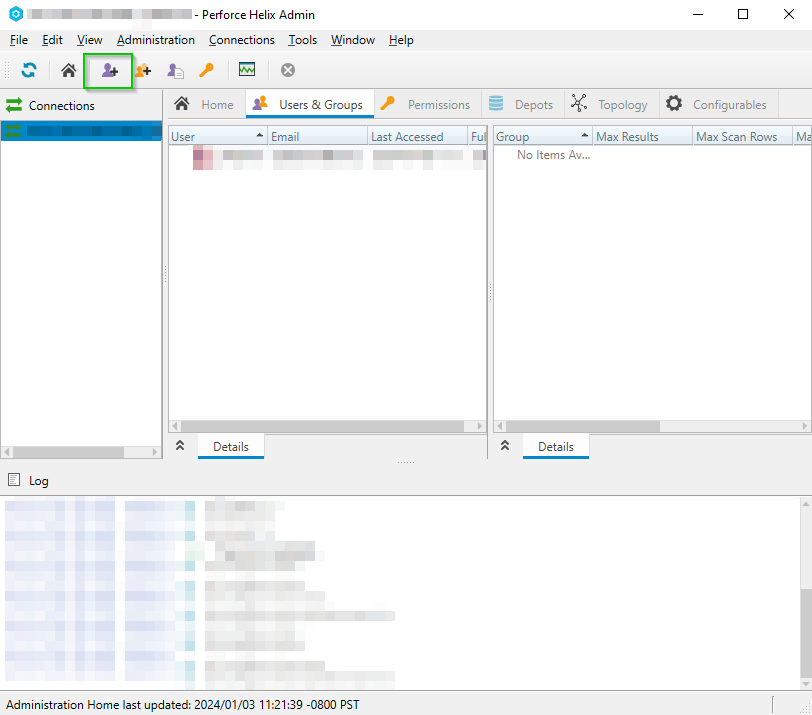
- Enter the details of the new user, such as
User(username),Email,Full Name,Authmethod(keep the default perforce),PasswordandType(default: standard). ClickOKto create the new user account.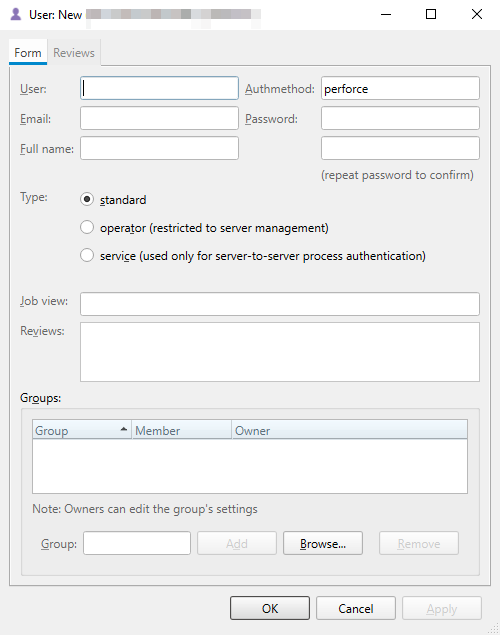
- Through CLI in Linux: On your Perforce server, you can also use the following command to create a new user:
1
   p4 user [new_username]
After running this command, fill out the user information. This is typically done while logged in with the Perforce server administrator user.
- Assigning Permissions: Create groups with specific access rights and add users to these groups to manage permissions efficiently. This is usually managed through the Perforce superuser account.
Conclusion
Congratulations, you’ve successfully installed and configured the Perforce Helix Core Server on a CentOS or Red Hat Enterprise Linux system. With the recommended hard disk setup and initial configurations completed, your Perforce server should be up and running optimally.
Featured Tweet
Setting up Perforce Helix Core sever can seem daunting, but we've got you covered with a comprehensive step-by-step guide, ensuring you follow best practices every step of the way.#Perforce #HelixCore #Linux #SysAdmin #ITPro #HomeLab #TechBlogshttps://t.co/CcSZrHDwPX
— rcdevops (@rcdevops) February 3, 2024


