Remotely Developing in Docker with Visual Studio Code and Dev Containers extension
Introduction –
In today’s world, developing applications using containers has become a standard practice. Docker offers a way to run applications securely isolated in a container, packaged with all its dependencies and libraries.
However, developing inside a Docker container has its own challenges, such as setting up a productive environment inside the container or dealing with the differences in OS and file paths. To overcome these challenges, we’ll leverage the power of Visual Studio Code (VS Code) and its extension - Dev Containers extenstion, which allows you to use a Docker container as a full-featured development environment.
In this blog post, I’ll walk you through setting up a development environment inside a Docker container using VS Code and the Remote Containers extension. For this guide, we’ll be setting up a Node.js development environment, but the steps are quite similar for other programming languages.
Prerequisites
Before you start, you’ll need:
- The latest version of Visual Studio Code installed. If you haven’t got it yet, download it here.
- Docker installed and running on your remote machine. Docker Desktop for Windows or Mac, or Docker Engine for Linux.
- A basic understanding of Docker and VS Code.
Step-by-Step Guide
Step 1: Install Remote Development Extension Pack
-
Open Visual Studio Code.
-
Click on the Extensions view icon on the Sidebar (or press
Ctrl+Shift+X). -
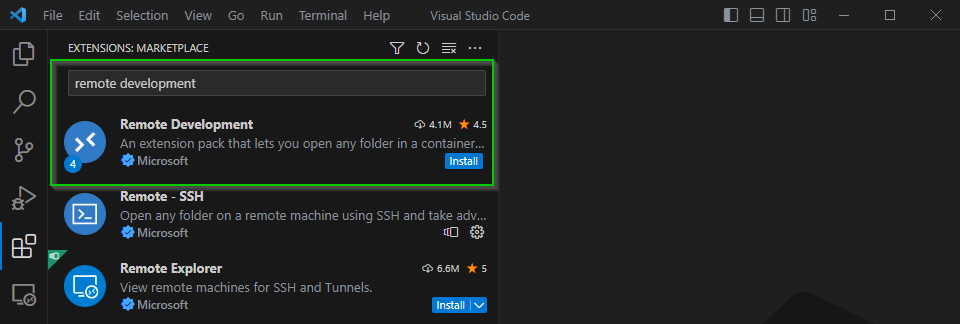
In the Extensions view, search for “Remote Development”. You should see an extension pack called “Remote Development” by Microsoft.
-
Click on the install button for the “Remote Development” extension pack. This will install the Remote - Containers extension along with the Remote - SSH and Remote - WSL and Deve Containers extensions. We will be using the Dev Containers extension for remote docker container development.

After installation, you will see the Remote Window icon in the bottom-left of the Status bar. This allows you to control and manage your remote and container connections.
Step 2: Set Up Your Node.js Application and Docker Container for Development
Before we can define our Docker container, let’s set up a directory for our Node.js application:
-
In the terminal, navigate to the directory where you want to set up your application.
- Create a new directory called
app:1
mkdir app - Navigate into the
appdirectory:1
cd appThis directory will serve as the workspace for all your Node.js application files.
- For demonstration purposes, let’s create a
app.jsfile which will contain a basic Node.js script:1
sudo vi app.js - Once inside the
app.jsfile, paste the following Node.js script: ``` const http = require(‘http’);
const hostname = ‘0.0.0.0’; const port = 8080;
const server = http.createServer((req, res) => { res.statusCode = 200; res.setHeader(‘Content-Type’, ‘text/plain’); res.end(‘Hello World!\n’); });
server.listen(port, hostname, () => {
console.log(Server running at http://${hostname}:${port}/);
});
1
2
3
4
5
6
7
8
9
10
11
12
13
14
15
16
17

This script will set up a basic HTTP server that listens on port 8080 and responds with "Hello World!" to any request.

Save this `app.js` file to your `app` directory on the Docker host. This file will be automatically available inside the Docker container due to the volume mapping we defined in the Docker Compose file.

6. Next, let's define our Docker container for development. Go back to the parent directory (`cd ..`) and create a `docker-compose.yml` file with the following content:
```yml
version: '3.7'
services:
  app:
    image: node:18
    volumes:
      - ./app:/app
    working_dir: /app
    command: node app.js
    ports:
      - 8080:8080
This Docker Compose configuration defines a service named app using the Node.js 18 Docker image. Let’s break down each section:
-
version: '3.7': Specifies the version of the Docker Compose file format being used. -
services: Defines the services that make up the application. -
app: The name of the service. -
image: node:18: Specifies the Docker image to be used for theappservice, which is the official Node.js 18 image. -
volumes: Mounts the local./appdirectory to the/appdirectory inside the container. This allows you to edit the application code on your local machine and have the changes reflected inside the container. -
working_dir: /app: Sets the working directory inside the container to/app, so any subsequent commands will be executed from that directory. -
command: node app.js: Specifies the command to run when the container starts. In this case, it runs thenodecommand with theapp.jsscript file. -
ports: - 8080:8080: Maps port 8080 of the host machine to port 8080 of the container. This allows you to access the application running inside the container viahttp://localhost:8080on your local machine.
With this configuration, you can start the container using docker-compose up, and it will run the Node.js application on port 8080 inside the container, making it accessible from your local machine.
With this setup, you’re ready to start your Docker container and connect to it with Visual Studio Code. You can proceed to the next steps of the guide.
Step 3: Start the Docker Container
In your terminal, navigate to the directory with the docker-compose.yml file and start the Docker container:
1
docker-compose up -d
Step 4: Connect to Docker Container with VS Code
-
Open Visual Studio Code.
-
Click on the Remote Window icon in the bottom-left of the Visual Studio Code status bar.

-
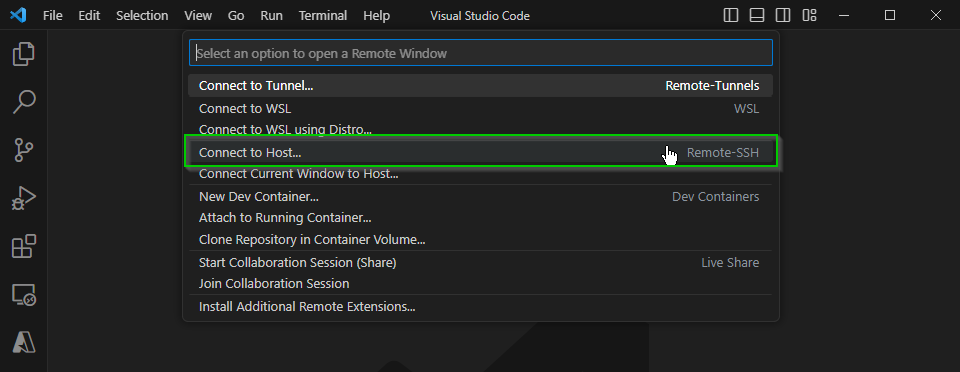
Click on “+ Add New SSH Host…” and input your SSH command to connect to your remote VM where your Docker container is running (e.g.,
ssh user@remote-ip).
-
If you haven’t previously connected to this host from VS Code, you’ll be asked to confirm its authenticity. Approve the connection. You will also be ase to confirm which platform the remote host is running on, such as Linux, Windows or macOS. Finally, you will need to enter the password or configure the SSH private key to login to the remote host.
-
Once you’re connected to your remote machine using SSH in VS Code, click again on the green “Remote Development” button.
-
Select “Remote-Containers: Attach to Running Container…” and enter your SSH password if prompted.
-
From the dropdown, select the running Docker container you want to connect to. This will be the Docker container running our Node.js app. Enter your password again if prompted and wait patiently as the dev container environment starts.

VS Code will start a new window connected to the Docker container. The container’s file system will be the workspace root, and you’ll be able to work inside the container just as if it was a local workspace. Even though the Docker container is on a remote machine, with this setup you can write, run, and debug your Node.js code from your local VS Code instance as if you were working on your local machine.
Step 5: Start Developing!
Now that you’re connected to your Docker container through Visual Studio Code, you can begin to develop as you normally would on your local machine. The difference is that now, all your development activities are happening inside the Docker container. This environment is isolated, which means it doesn’t matter whether you’re working from a Windows, Mac, or Linux operating system on your local machine. The development environment will remain consistent.
Here are some tips to get you started:
- Explore the file system: In the left sidebar of Visual Studio Code, you can see the entire file system of your Docker container. This includes your application files mounted from the host machine. You can open any of these files to edit them.
- Create a new file: To create a new file, simply click on the “New File” icon in the sidebar. This file will be created within the Docker container, but because we’re mounting our application files from the host machine, you’ll also be able to access it from the host.
- Start your application: You can start your Node.js application right from the terminal in Visual Studio Code. Click on “Terminal” in the top menu, then select “New Terminal”. This opens a terminal inside your Docker container. From here, you can start your Node.js app using
npm start,node app.js, or whatever command your application uses. - Debug your application: You can debug your application using the built-in debugging tools in Visual Studio Code. Just set a breakpoint in your code, then click on the “Run and Debug” button in the left sidebar. Make sure to select the correct Node.js environment for debugging.
- Install new npm packages: To install new npm packages, you can use the terminal just as you would on your local machine. For example, you can run
npm install expressto install Express.js in your project. - Check logs: You can check the logs of your running application right from Visual Studio Code. Click on “View” in the top menu, then select “Output”. From the dropdown in the “Output” panel, select your Docker container to see its logs.
Happy coding! With this setup, you can enjoy a consistent, reproducible, and isolated development environment using Docker and Visual Studio Code.
Conclusion
In this article, we explored the process of developing applications inside a Docker container using Visual Studio Code and the Remote Containers extension. We learned how to set up a Node.js development environment inside a Docker container and connect to it using the powerful features of VS Code.
By leveraging the Remote Containers extension, we were able to establish a seamless connection between our local machine and the Docker container. This allowed us to work with our Node.js code and dependencies inside the container while enjoying the familiar coding experience of VS Code.
We started by installing the Remote Development extension pack, which includes the Remote Containers extension. Then, we set up our Node.js application and Docker container using Docker Compose. We created a basic Node.js script and defined the Docker Compose configuration to run our application inside the container.
After starting the Docker container, we connected to it with VS Code using the Remote Containers extension. This enabled us to edit and debug our Node.js code directly within the container, as if we were working in a local workspace. We explored the file system, created new files, started the application, and even debugged it using the built-in debugging tools of VS Code.
By following these steps, we were able to achieve a consistent and reproducible development environment using Docker and VS Code. This setup allows us to easily collaborate with team members, share the development environment, and ensure consistency across different operating systems.
I have provided a Docker Compose configuration and a basic Node.js application repository at https://github.com/rcormie/nodejs-18-docker. Feel free to explore and use it as a starting point for your own Node.js projects.
Featured Tweet
Excited to share our tech blog post on Remotely Developing in Docker with Visual Studio Code and Dev Containers extension! 🐳#Docker #VSCode #Development #DevOps #RemoteContainershttps://t.co/TCUy6QRgtK
— rcdevops (@rcdevops) February 3, 2024

