Setting up and Configuring TrueNAS
Introduction –
TrueNAS is a powerful network-attached storage (NAS) solution that can be used to store and manage data in a variety of environments. In this guide, we will walk through the process of setting up and configuring TrueNAS, including minimum and recommended specs, configuring storage pools and SMB shares, securing TrueNAS with cybersecurity best practices, using a Active Directory domain account to manage TrueNAS.
Minimum and recommended Specs
Before we begin setting up TrueNAS, it is important to understand the minimum and recommended specs for the hardware that will be running TrueNAS. According to the TrueNAS documentation, the minimum recommended specs for a TrueNAS system are as follows:
- 8GB of RAM
- 2 or more CPU cores
- 16GB or more of boot device storage
- 60GB or more of storage for data
It is important to note that these are the minimum recommended specs, and that more powerful hardware may be required depending on the specific use case.
1. Install and configure TrueNAS
Here are the steps to install and configure TrueNAS:
-
Download the latest version of TrueNAS from the official TrueNAS website.
-
Burn the downloaded ISO file to a bootable USB stick or CD/DVD using suitable software like Rufus.
-
Insert the bootable media into the server on which you plan to install TrueNAS and reboot it. Ensure the system is set to boot from the inserted media in the BIOS settings.
-
Once booted from the media, you will see the TrueNAS installer menu. Choose ‘Install/Upgrade’ to start the installation process.
-
You will be prompted to choose the disk where TrueNAS will be installed. Select the appropriate disk and confirm your selection. Be aware that all data on the chosen disk will be erased.
-
Set and confirm a root password for your TrueNAS system. Remember this password, as you will need it to log in to the TrueNAS web interface.
-
Choose ‘Boot via BIOS’ or ‘Boot via UEFI,’ depending on your server’s configuration.
-
The installation will now start. Once it’s complete, remove the installation media and choose the ‘Reboot System’ option.
2. Access TrueNAS Web Dashboard
After the installation of TrueNAS is completed, you can access its web interface by following these steps:
-
After restarting the server, TrueNAS will load and display a console setup menu. At the bottom of this menu, an IP address will be shown, which is the address of the TrueNAS web interface.
-
Open a web browser on a different computer connected to the same network as your TrueNAS server.
-
Enter the IP address displayed on the TrueNAS console into the web browser’s address bar and hit enter.
-
You will be greeted by the TrueNAS login screen. Enter ‘root’ as the username and input the password you set during the installation process.
-
After clicking ‘Sign In,’ you will have access to the TrueNAS web interface, where you can manage storage, shares, users, and more.
3. Integrating TrueNAS with Active Directory
Integrating your TrueNAS server with a Windows Active Directory domain empowers you to utilize AD user and group accounts in your TrueNAS permissions. Please bear in mind that this step is optional. If you have no need to connect your TrueNAS server to Active Directory, please proceed to the next step.
- Begin by verifying the timezone on your TrueNAS server. To do this, navigate to “System”, then select “General.” It is crucial to ensure the timezone is set accurately, as discrepancies may result in authentication issues with the domain.
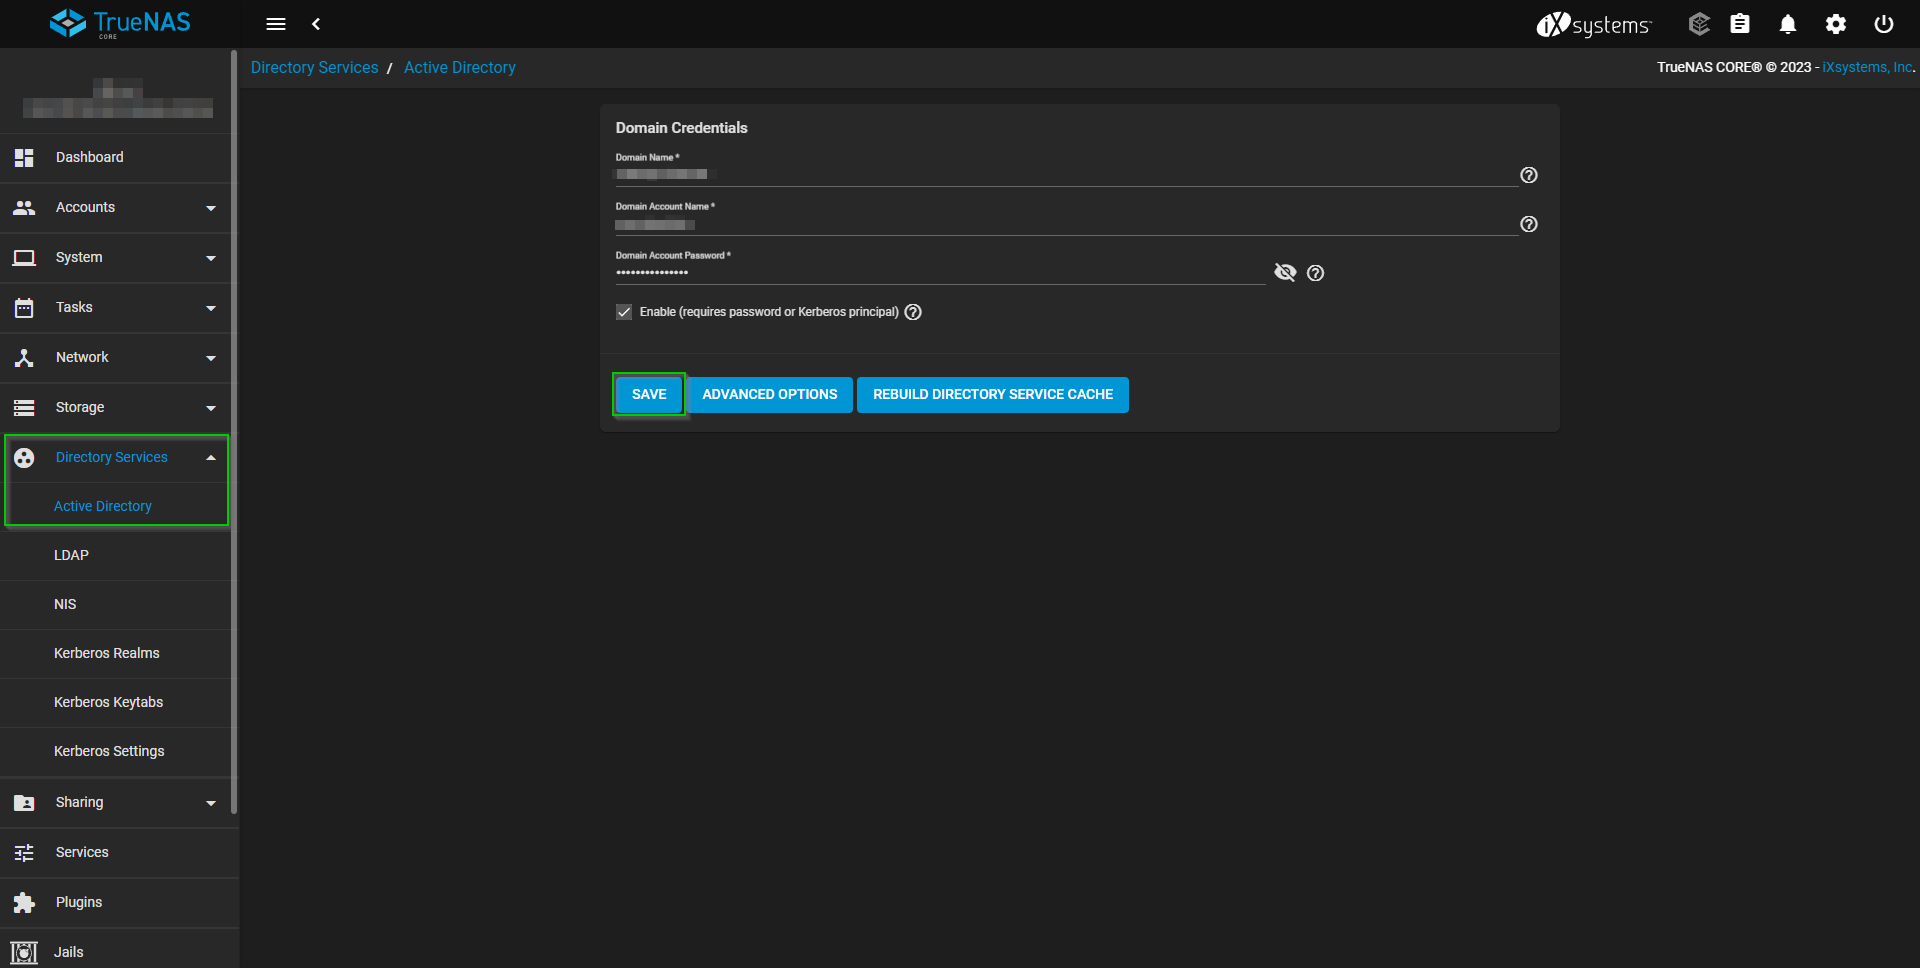
- Next, select the “Directory Services” tab and click on “Active Directory.”
Provide the following information:
- Domain Name: Enter the fully qualified domain name. Example: techfusion.internal
- Domain Account Name: Enter your Domain Admin account name.
- Domain Account Password Enter your Domain Admin account password.
- Enable (requires password of Kerberos principal): Check this to true.
 Verify that the TrueNAS server has been successfully incorporated into Active Directory Users and Computers.

4. Setup Storage Pools in TrueNAS
- Expand “Storage” and click “Pools.”
- Click “Add.”
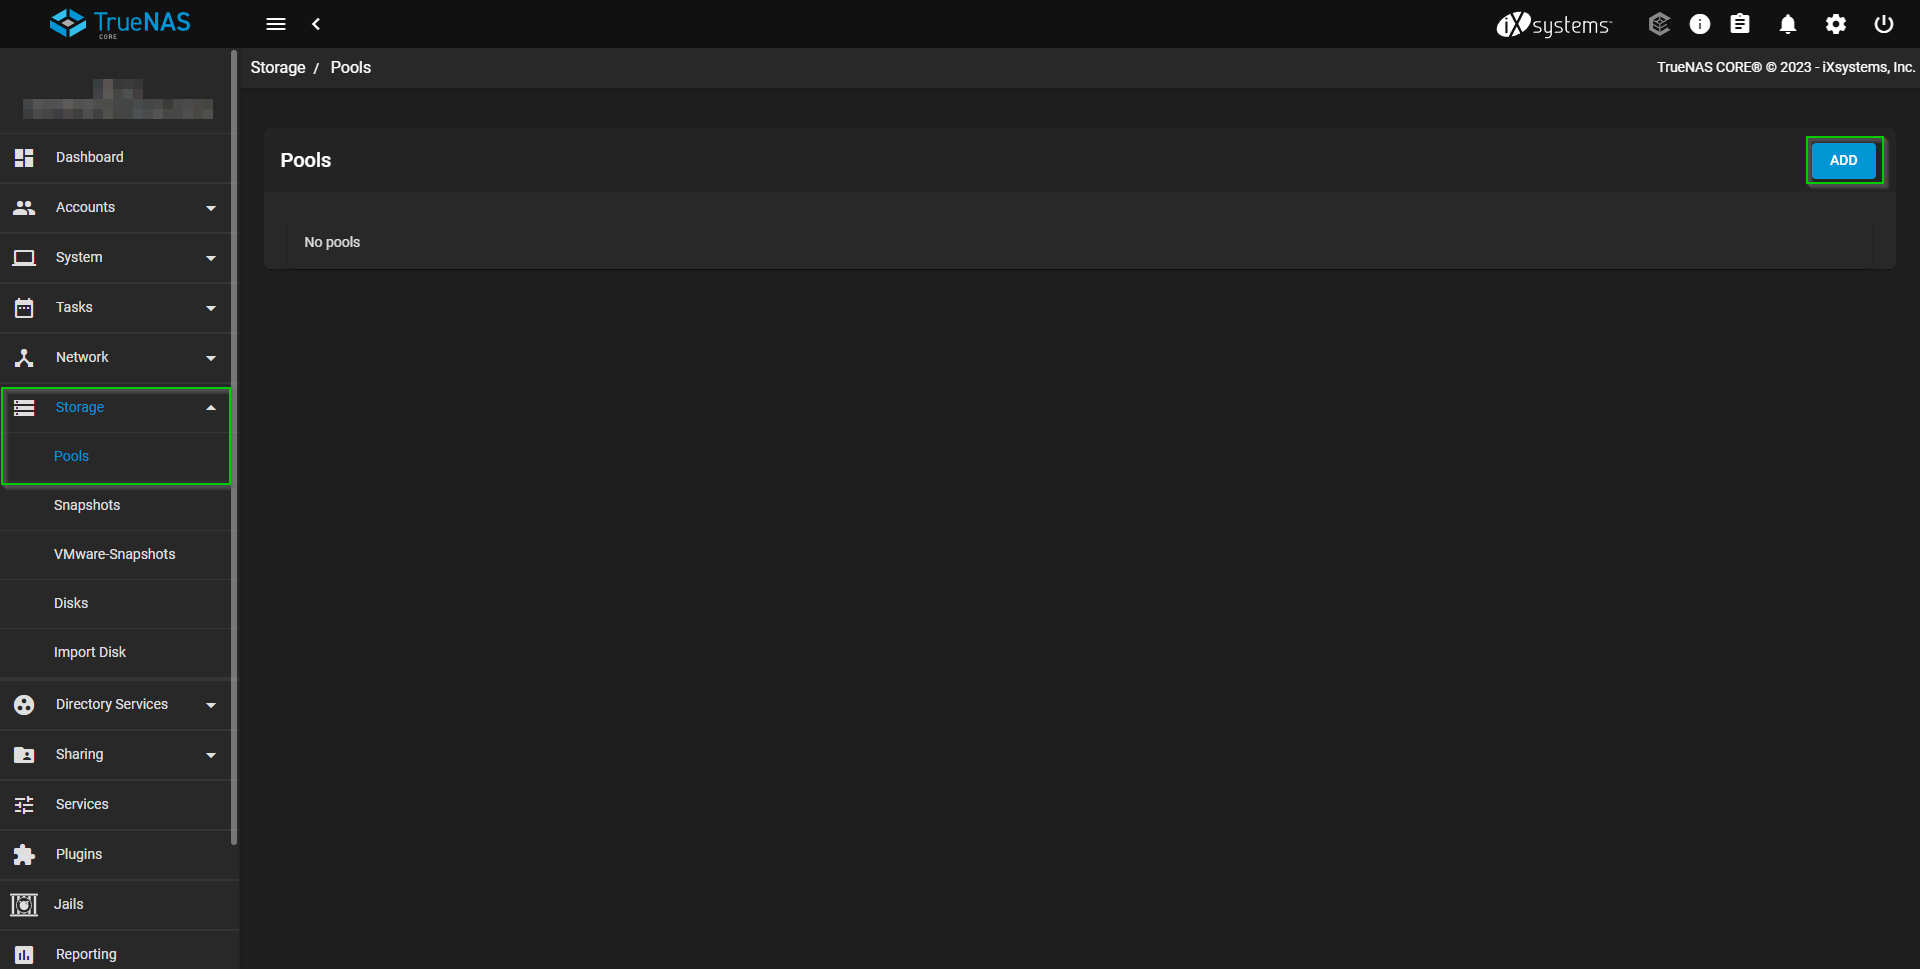
- Click “Create Pool.”
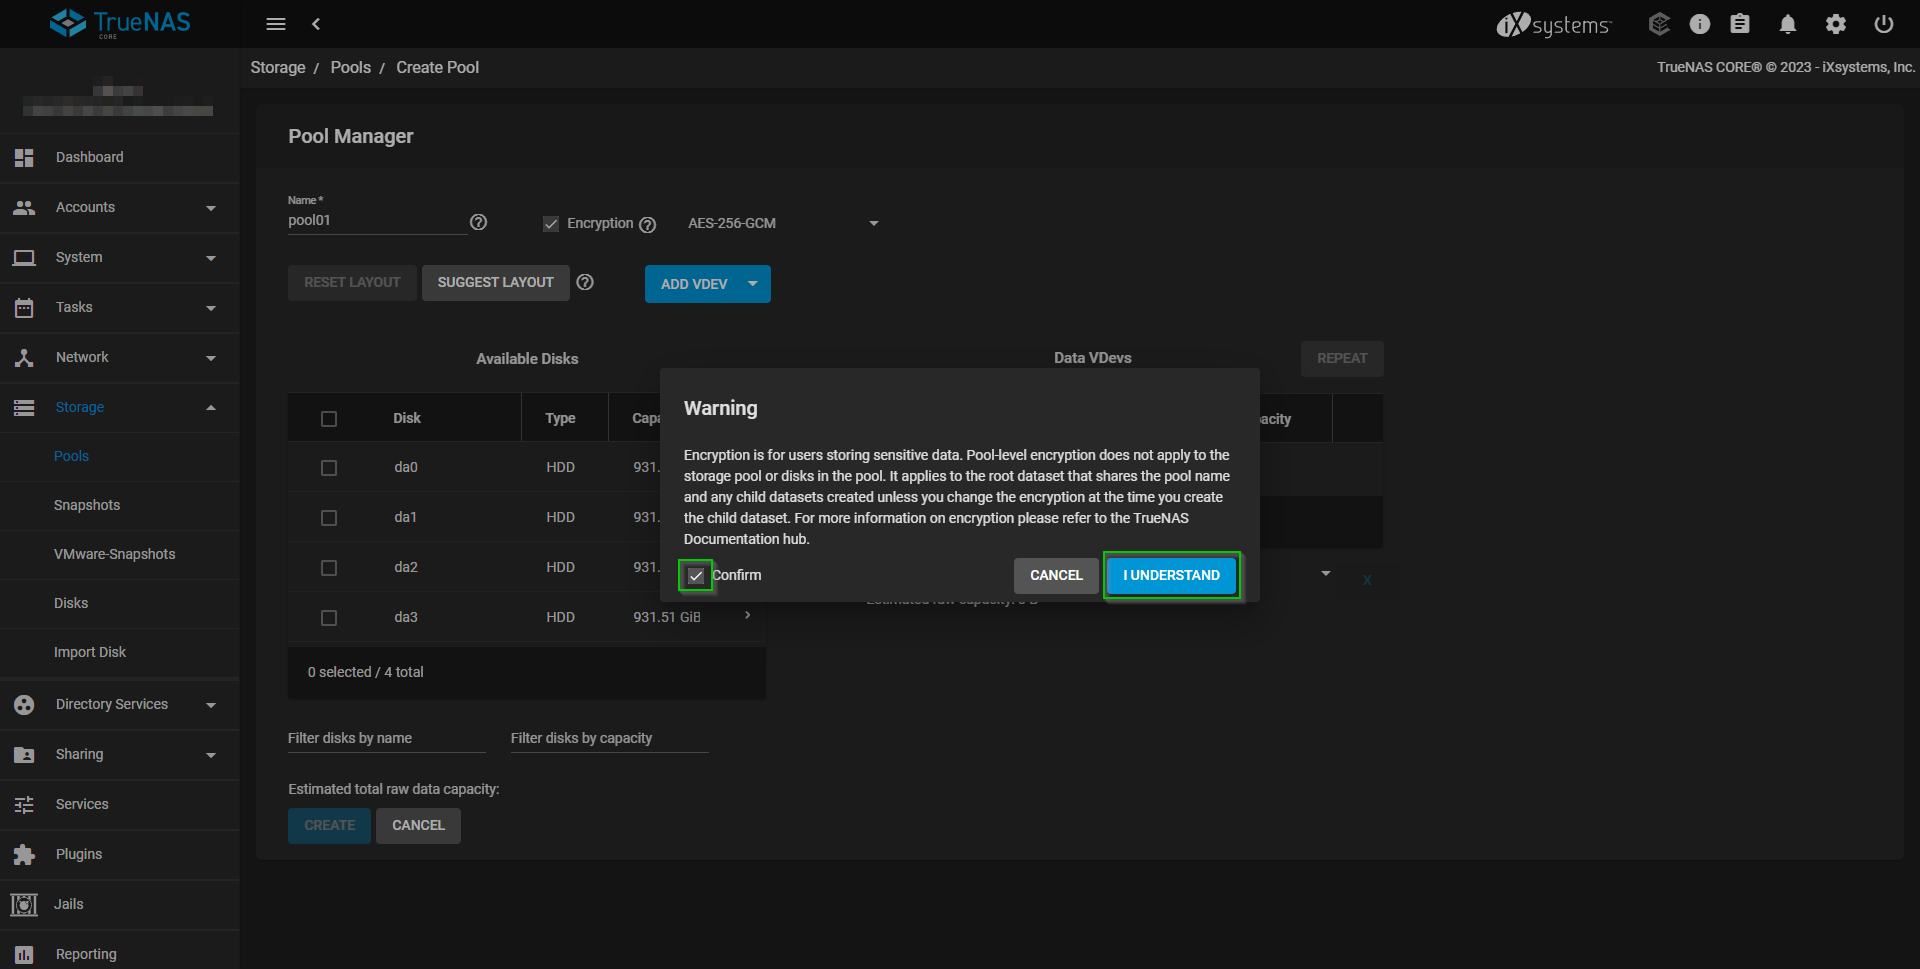
- Assign a descriptive name to the new Storage Pool, ensuring it adheres to the ZFS naming conventions. The conventions permit the use of Underscores (_), Hyphens (-), Colons (:), and Periods (.), and the name must begin with a letter. You can check out the full naming requirements at this link: https://docs.oracle.com/cd/E23824_01/html/821-1448/gbcpt.html
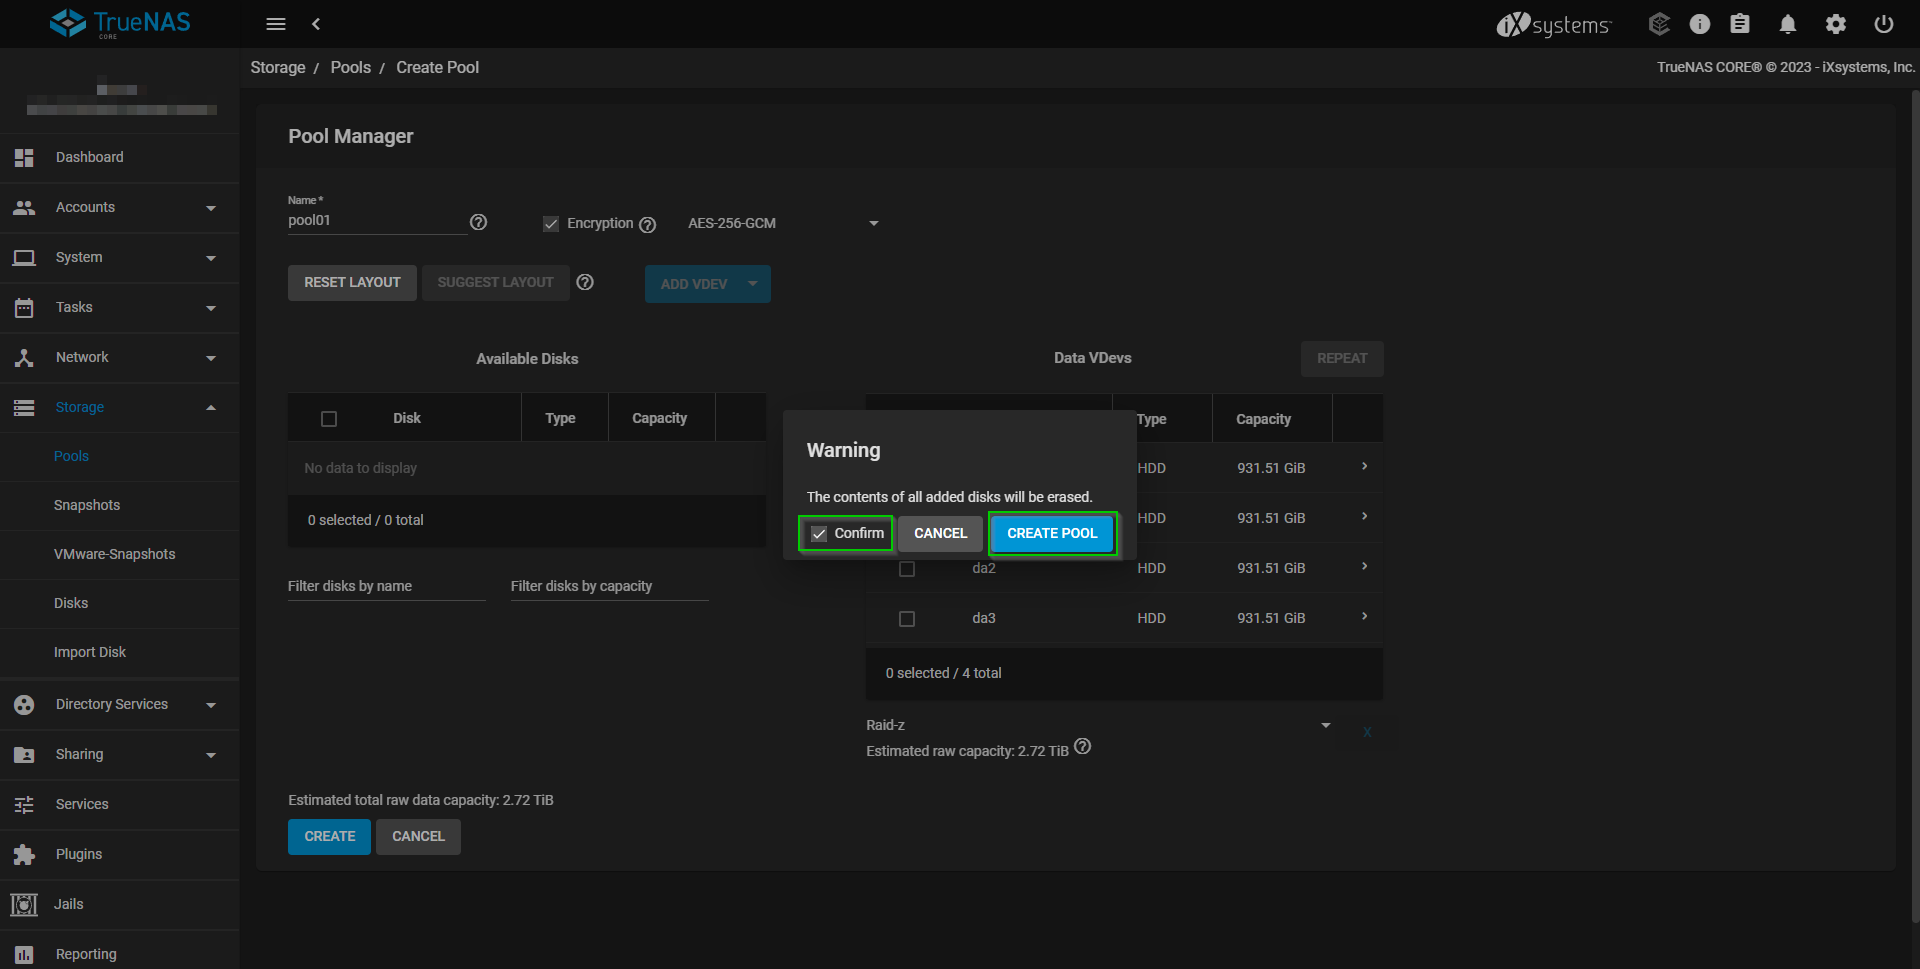
- It’s generally advised to enable Encryption. Though this could affect performance, the benefits of having an encrypted pool usually outweigh any performance degradation in most use cases. To do this, click the checkbox beside “Encryption,” then check the “Confirm” box and select “I Understand.”
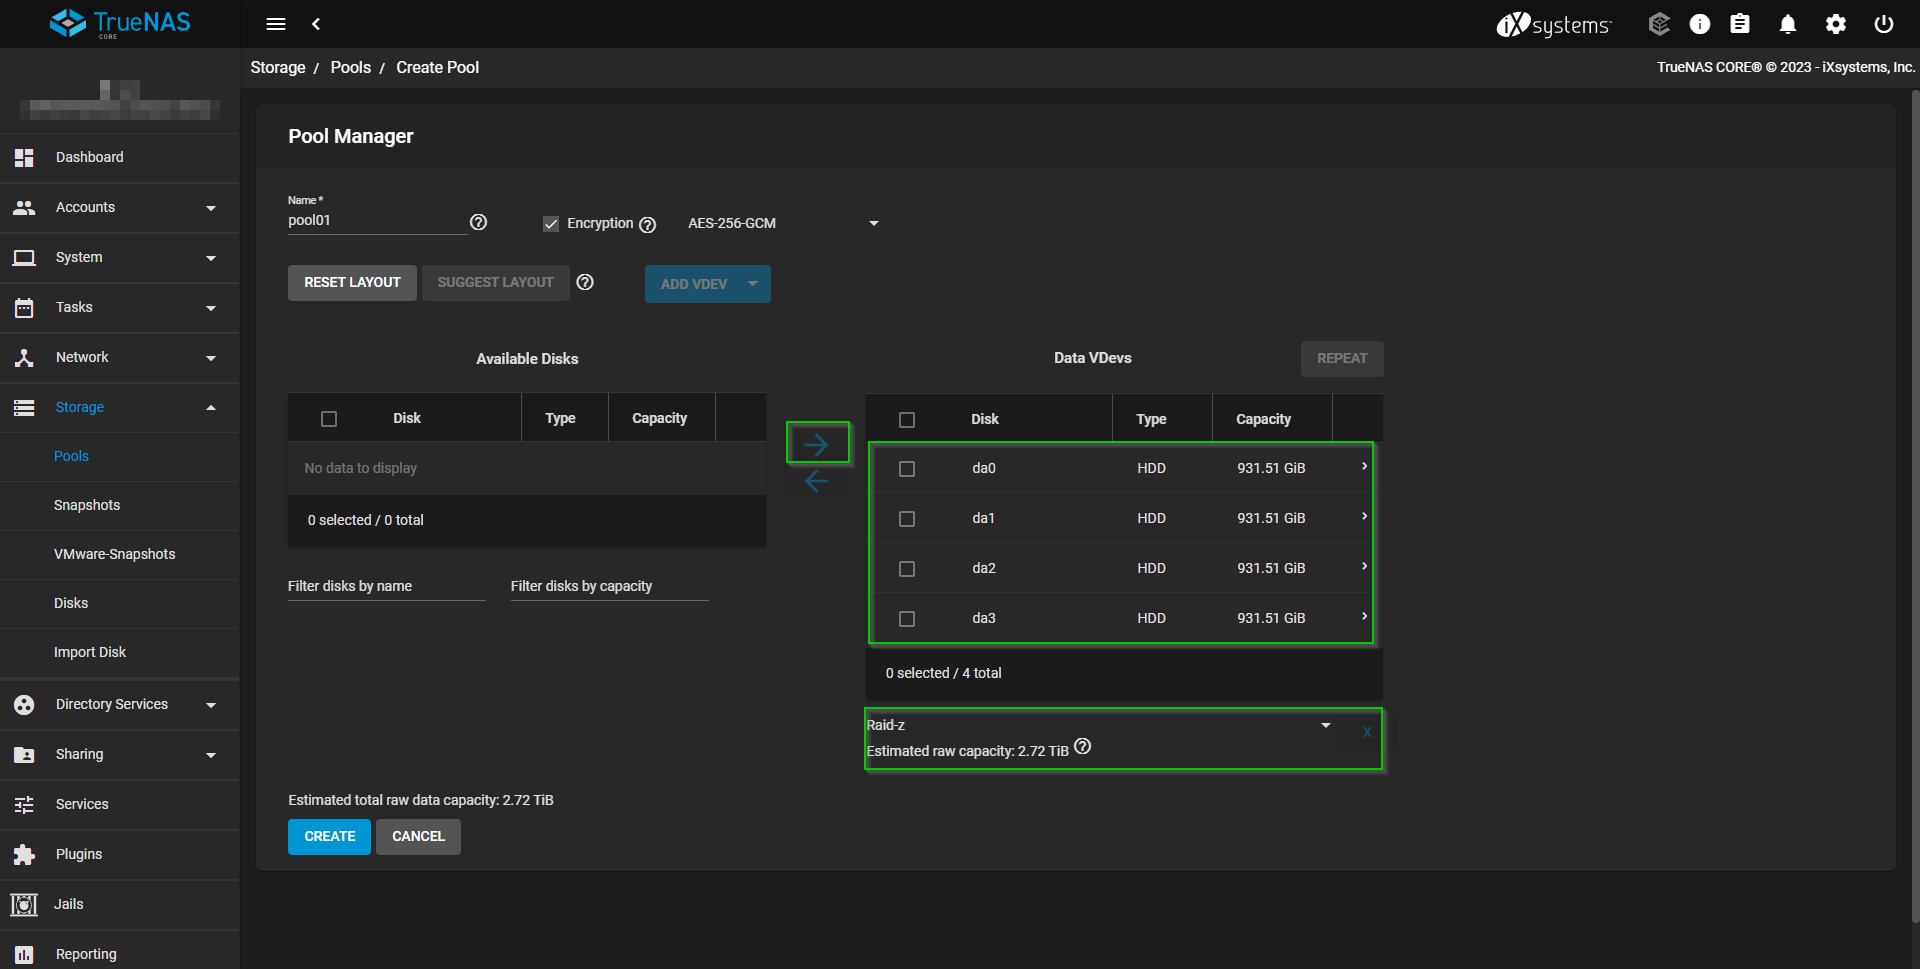
- Include the Available Disks by clicking the checkbox next to them, then clicking on the right arrow to add the disks to the Data VDevs section.
-
If needed, you can modify the RAID type for the disks by clicking on the “raid-z2” entry, located below the VDevs section. Note that, in this example, we are using four 1TB SAS hard drives.
Here’s a brief overview of the RAID types available in TrueNAS:
-
Stripe (RAID 0): This configuration splits or “stripes” data evenly across two or more disks without parity information for redundancy. It’s the fastest RAID configuration because it allows multiple drives to read and write data simultaneously. However, it provides no redundancy - if one drive fails, all data is lost. Given your requirement for redundancy, this would not be a suitable option.
-
Mirror (RAID 1): This configuration duplicates the same data onto two or more disks. It provides high redundancy - as long as at least one disk survives, no data is lost. However, it’s not the most space-efficient method because it halves the total available storage. In your case, with four 1TB drives, you would end up with 2TB of usable space.
-
RAID-Z (RAID 5 equivalent): RAID-Z is a data/parity distribution scheme like RAID 5, but it uses dynamic stripe width. Every block is its own RAID stripe, regardless of blocksize, resulting in every RAID-Z write being a full-stripe write. This eliminates the RAID-5 “write hole”. With four 1TB drives, you would have 3TB of usable space. If one drive fails, you can replace it without losing data, but performance will degrade until the new drive is fully integrated.
-
RAID-Z2 (RAID 6 equivalent): RAID-Z2 is similar to RAID-Z but allows for two drive failures within the array without data loss. This option provides a higher level of redundancy at the cost of available space. With four 1TB drives, you would have 2TB of usable space.
-
- Click “Create” to create the new Storage Pool. Finally, On the window pop up, click the “Confirm” checkbox and click “Create Pool.”
5. Understanding ZFS: Datasets and Zvols
ZFS, the powerful filesystem used by TrueNAS, offers a unique approach to data management with two main structures for storing data: datasets and zvols (short for “ZFS volumes”). But what exactly are these, and when should you use each one? Let’s dive in.
Dataset: A dataset is essentially a filesystem, like you might create with other file systems like ext4 or NTFS. Datasets can have files and folders stored inside them, and they can also have other datasets nested inside them, similar to how you can have subdirectories within a directory. Datasets support all the typical filesystem features you’d expect, like permissions and quotas. They also support ZFS-specific features like compression, deduplication, and snapshots. Snapshots can be taken at the dataset level, and they capture the state of that dataset at a particular point in time.
Zvol: A zvol, on the other hand, is a block device. This means it operates at a lower level and can be used to provide raw storage to other systems. For example, you might create a zvol if you were using TrueNAS to provide storage for a virtualization system like VMware or KVM. The virtualization system would see the zvol as a raw disk that it could format with its own filesystem.
Zvols also support ZFS features like compression, deduplication, and snapshots, but they don’t support features that are specific to filesystems, like permissions and quotas.
It’s worth noting that if you want to set up your TrueNAS server as an iSCSI Target, you will need to create a Zvol.
In general, you would use a dataset when you want to store files directly on your TrueNAS system, and you would use a zvol when you want to provide raw block storage to another system.
Create Dataset in TrueNAS
In TrueNAS, a dataset is like a file folder that resides within a storage pool. It is used to organize and manage data, controlling the storage properties of its included files. Let’s delve into the steps to create a dataset.
-
Open the storage section: Once logged in, navigate to the side menu on the left. Select the “Storage” option.
-
Access Pools: Under the “Storage” section, select the “Pools” option to view your existing storage pools.
-
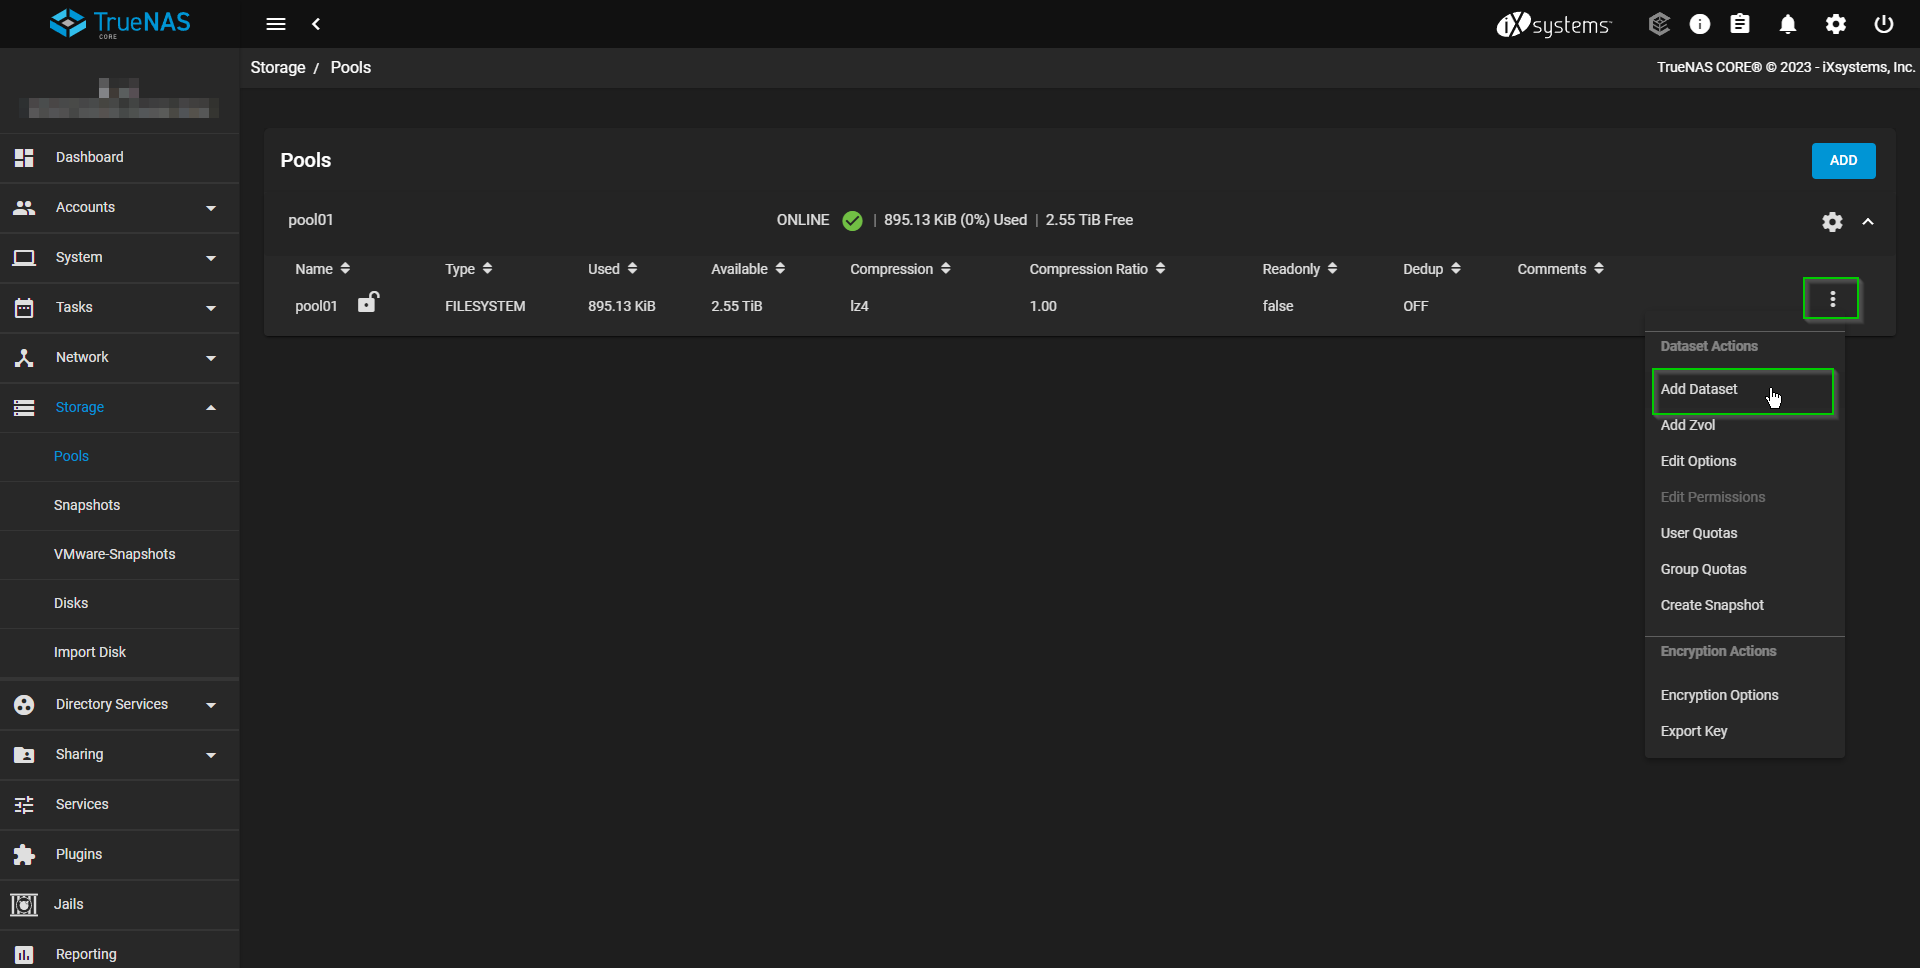
Choose the Pool: If you have multiple pools, identify the one where you want to create a new dataset. Click the 3-dotted options menu beside your chosen pool, and then select “Add Dataset”.
-
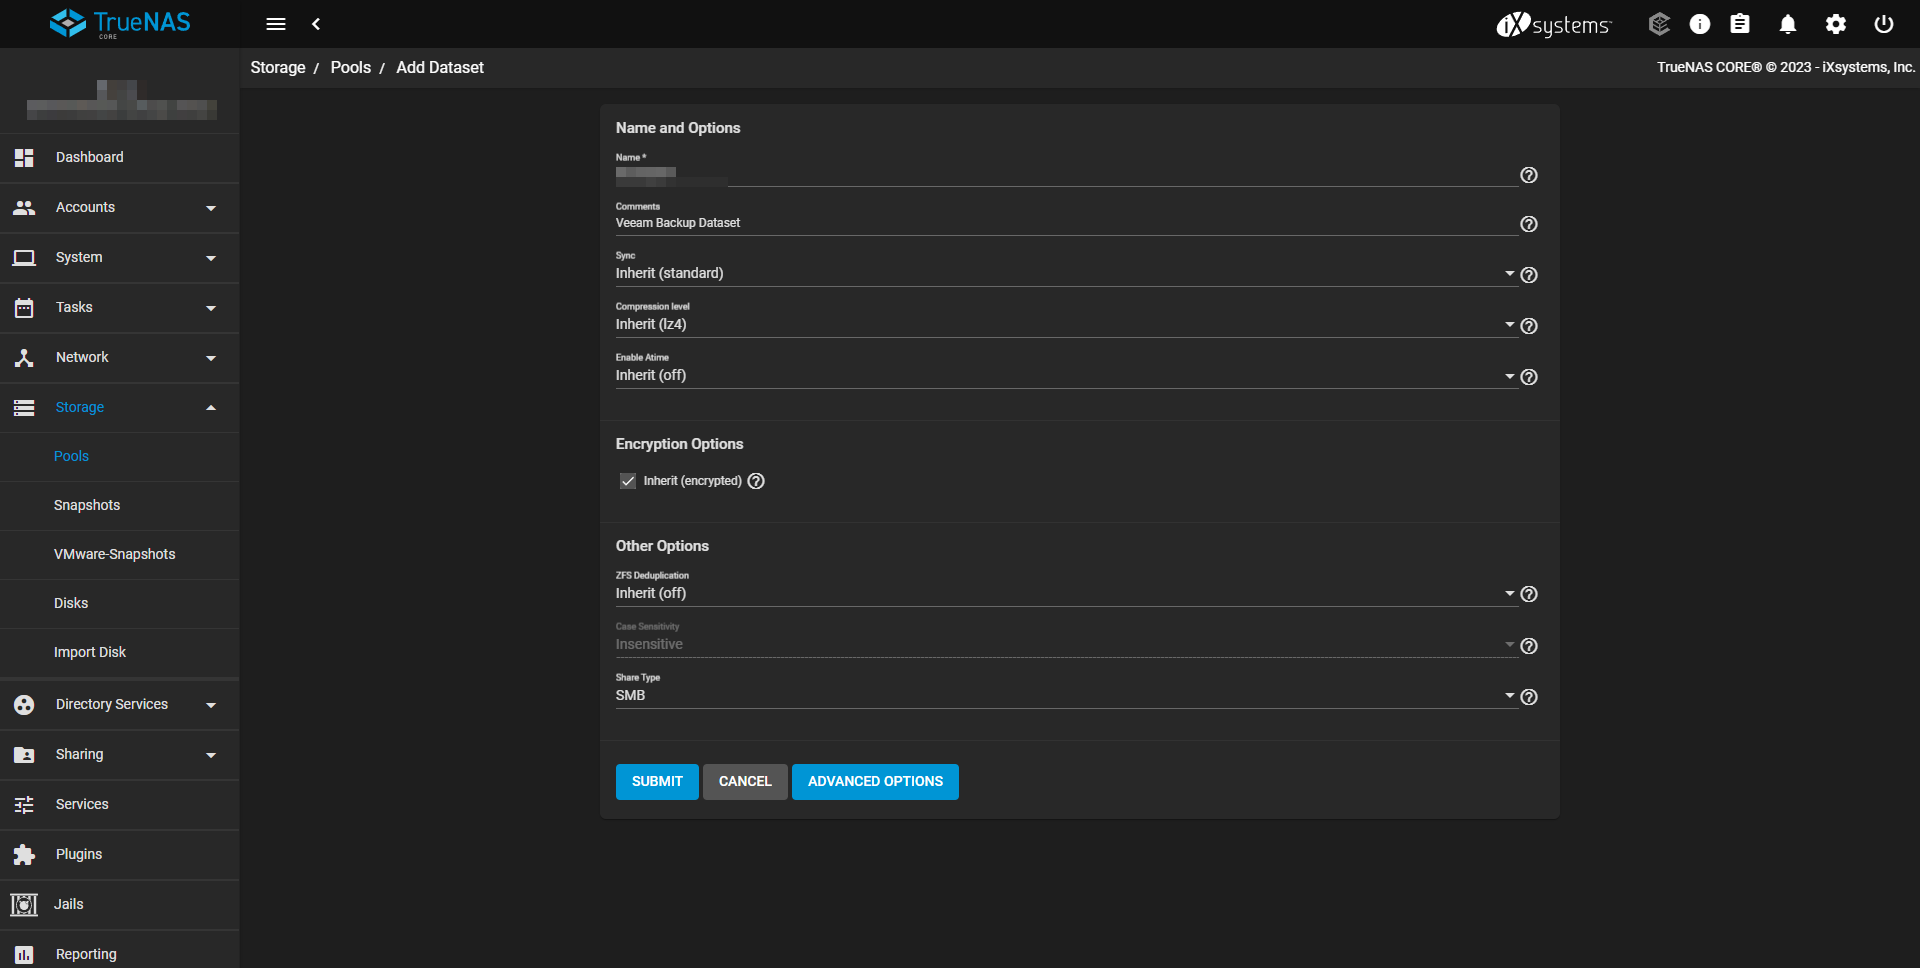
Fill in Dataset Details: In the new screen, fill out the necessary information for your dataset. This includes the Name, Comments (optional), Sync (which controls how frequently data is written to the disk), Compression level, and other advanced settings as per your requirements.
-
Save your changes: Once you’re satisfied with the settings, click the “Save” button to create your dataset. You should now see it listed under your chosen pool.
Create ZVol in TrueNAS
Zvol, short for ZFS volume, is a feature provided by the ZFS file system (used by TrueNAS). Zvols can be used to create a raw block device within the ZFS file system which can be utilized for a variety of purposes, such as providing storage for a virtual machine. Here’s how to create one:
-
Navigate to the storage section: On the side menu, select the “Storage” option.
-
Enter the Pools section: Under “Storage”, click on “Pools” to display your storage pools.
-
Identify the desired Pool: Locate the pool where you’d like to create the new zvol. Click the 3-dotted options menu next to the pool, and select “Add Zvol”.
-
Specify Zvol Details: In the new dialog box, specify the name of your zvol and its size. You can also change other advanced settings like Block Size, Sync, Compression, and more, according to your needs.
-
Create the Zvol: Click the “Save” button to create your zvol. It will now be visible within your chosen pool.
6. How to make TrueNAS an iSCSI Target (ZVol)
Sure, here are the steps to create an iSCSI target in TrueNAS:
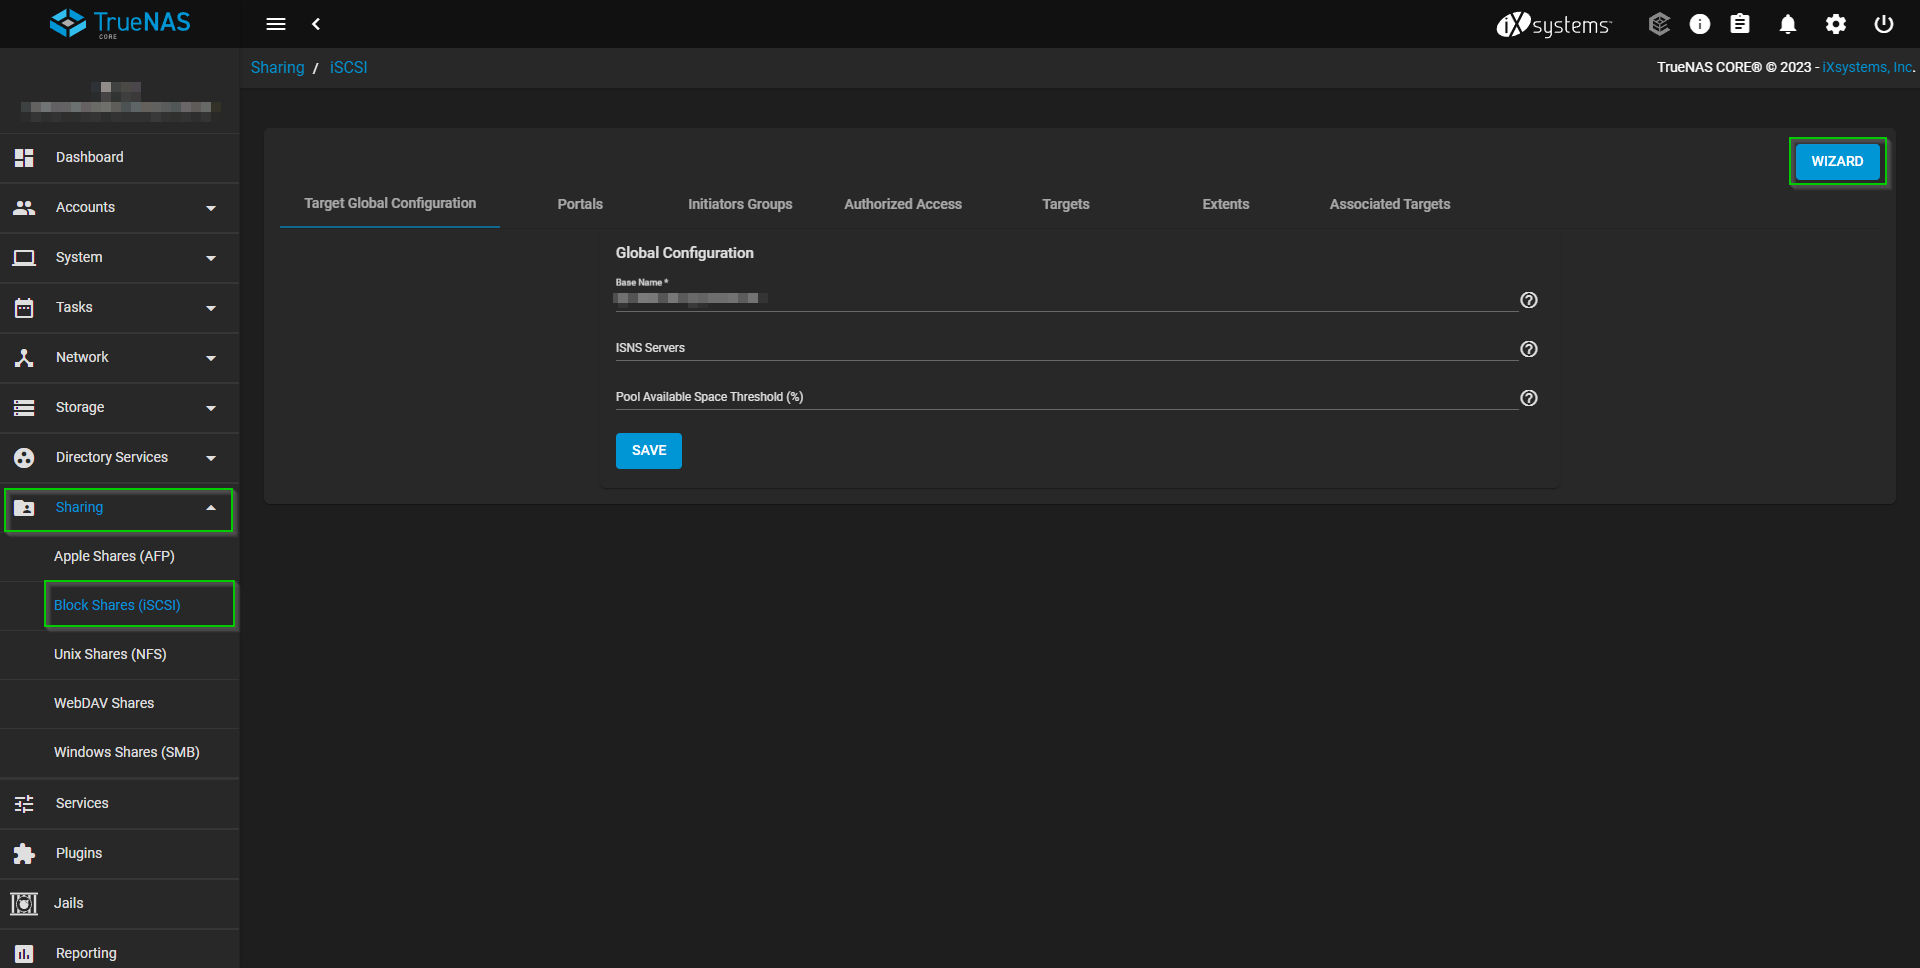
- Select “Sharing”, then select “Block Shares (iSCSI).”
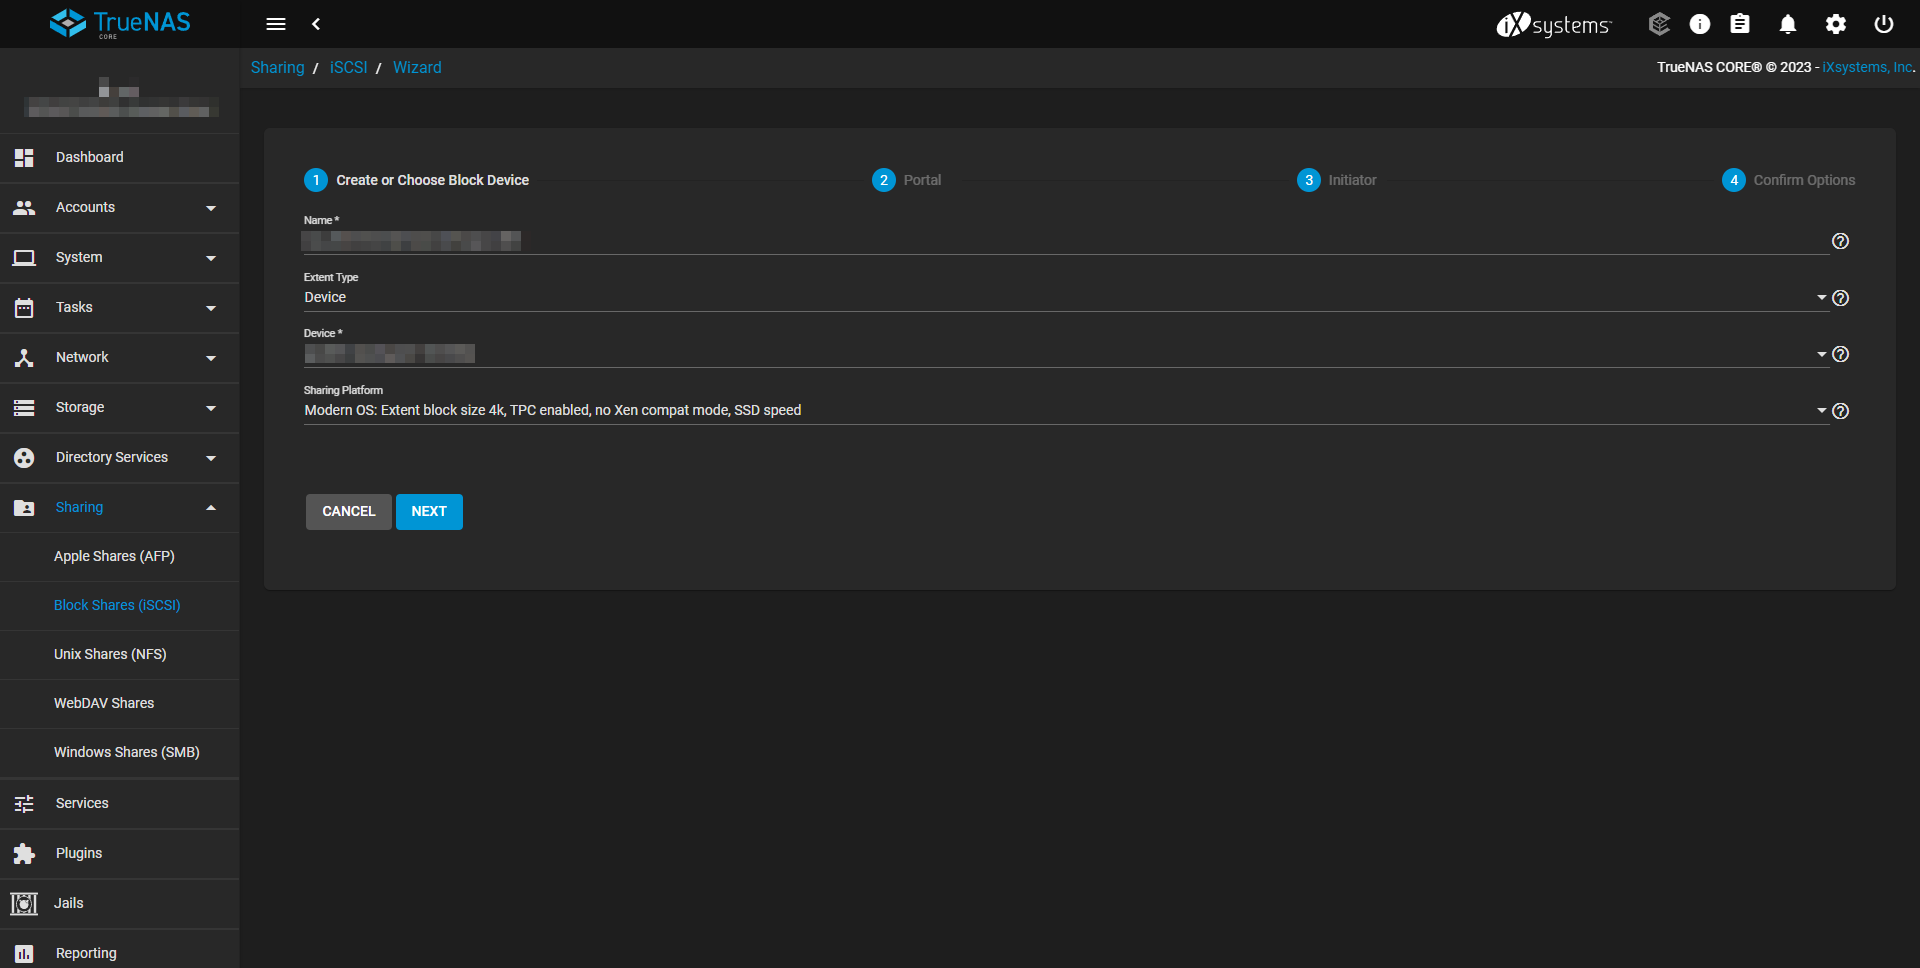
- Two mandatory fields need to be configured – ‘name’ and ‘device’. Assign a Name like “iqn.2023-05.org.freenas.ctl” then choose “Device” under “Extent Type.”
Note: An IQN is structured as such:
- “iqn” is the identifier type.
- “2023-05” is the date (YYYY-MM) when the naming authority was established.
- “org.freenas.ctl” is the reversed domain name of the naming authority, followed by a unique name under that authority’s jurisdiction.
- Next, choose the Device (if one was already created). If not, select the ‘Create New’ option in the dropdown menu. The device will be the storage pool created previously.
Upon selecting a Device, choose the Sharing Platform, then click ‘Next’. The Sharing Platform choice depends on the initiators that will be connecting. For most modern systems, the option “Modern OS: Extent size of 4K, TPC enabled, no Xen compat mode, SSD speed” is preferred. Click “Next” to proceed.
-
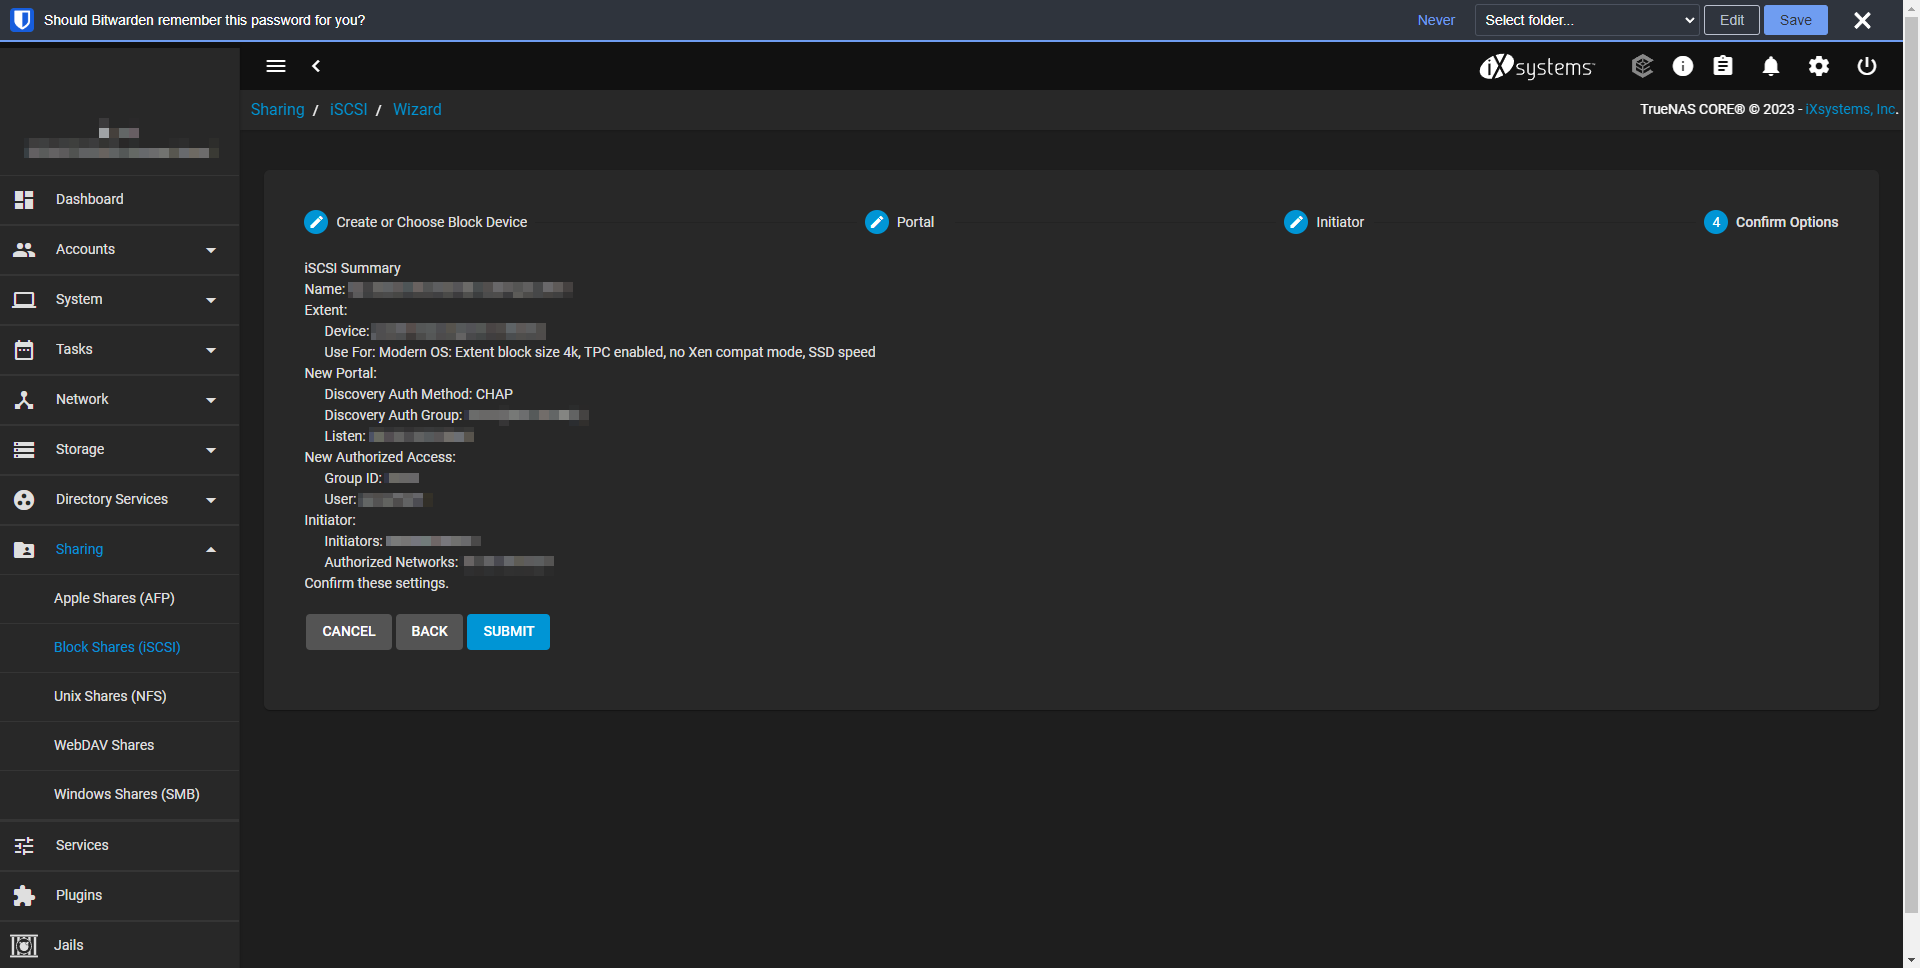
Choose a Portal or ‘Create New’ if none exist. Opt for “CHAP” as the “Discovery Authentication Method.” Also, select “Create new” for the “Discovery Authentication Group” – input a “Group ID,” “User” (which should be the initiator name of the iSCSI Initiator, such as iqn.2023-05.org.fileserver.ctl), and enter and confirm a password. Ensure the password length ranges between 12 and 16 characters. Subsequently, select the IP Address of the iSCSI Target, which in this instance, would be the IP Address of the TrueNAS server and retain the default port 3260. Click “Next” to continue.

-
Enter the hostname of an iSCSI Initiator you wish to utilize. You can specify initiators here by IP address or hostname. Next, enter the IP Address and CIDR of the “Authorized Network” – Note that it’s best practice to separate your storage network from your primary network, and only servers that are on the same network should be able to connect and authenticate using CHAP. Click “Next” to proceed. ![https://f002.backblazeb2.com/file/rcdevops/truenas-2023-05-22%2011_26_48.png(https://f002.backblazeb2.com/file/rcdevops/truenas-2023-05-22%2011_26_48.png)]
-
Lastly, verify the settings, then click “Submit”. Once all settings are saved, the iSCSI target will be successfully created.
7. Starting the iSCSI Service in TrueNAS
After everything has been configured for the iSCSI share, you need to start the iSCSI service:
- Select “Services” on the left-hand menu.
- Start the iSCSI Service, then select the Start Automatically checkbox so this service starts automatically.
- After the service is started, if you attempt to connect from an iSCSI Initiator, you should be able to connect.
8. Using Windows Server 2022 as an iSCSI Initiator
You can use Windows Server as an iSCSI Initiator to make the storage pools in TrueNAS available as storage.
-
Login to your Windows 2022 Server and launch the iSCSI Initiator by opening Server Manager and select Tools then iSCSI initiator.
-
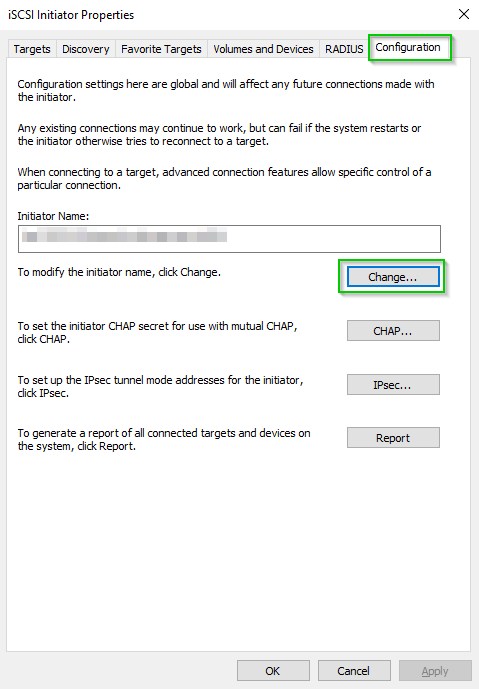
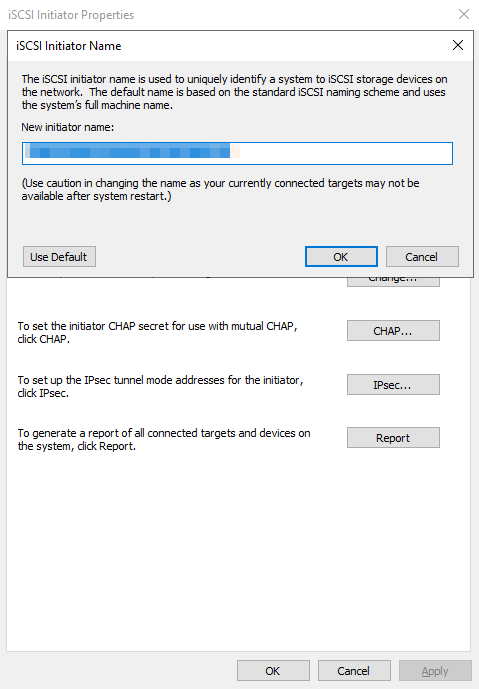
Select the “Configuration” tab and click “Change” to modify the Initiator name. The initiator name should be the same as the CHAP username entered while creating the iSCSI Portal. Click “OK” when done.
-
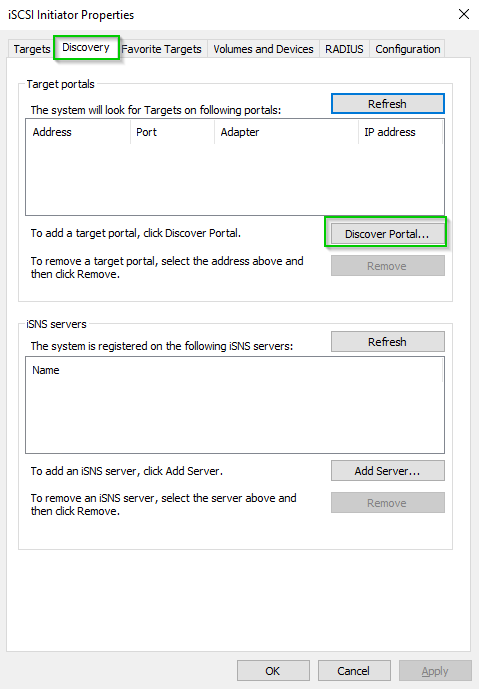
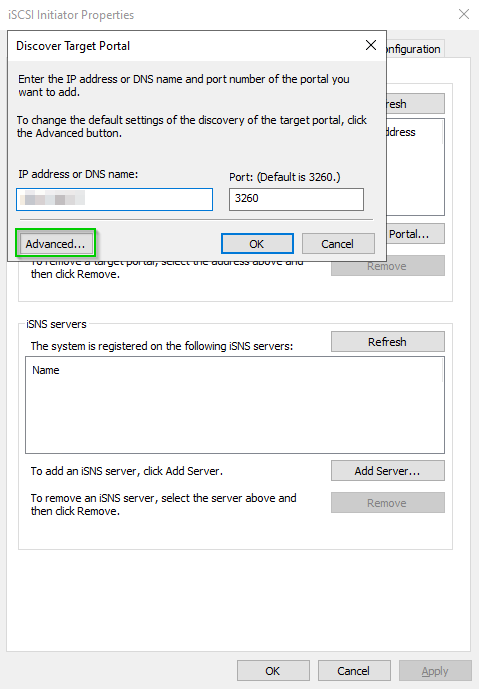
Enter the IP Address of the TrueNAS server and click “Advanced…”
-
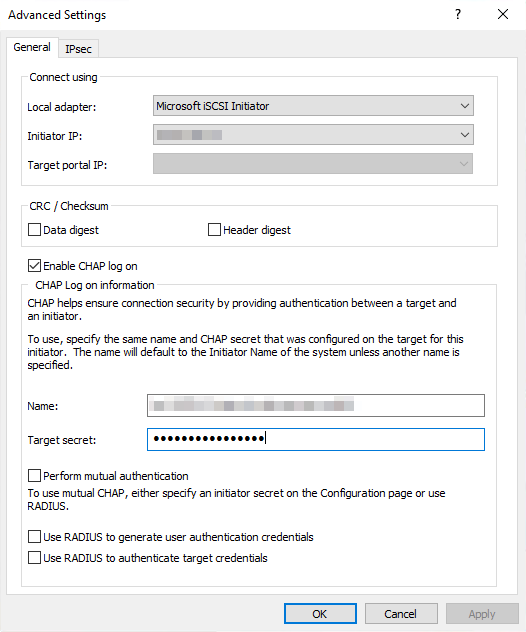
Select the local adapter, initiator IP, and click the checkbox next to “Enable CHAP log on.” Enter the target secret (this is the same password we used when creating the CHAP user in TrueNAS). Click both “OK” buttons.
-
Click on the “Targets” tab in the iSCSI Initiator Properties window. You should see the iSCSI target listed as “Inactive” under the “Discovered targets” text. Select the iSCSI target from the list and click “Connect.”

-
Click “OK” to complete the connection. The TrueNAS storage volume will now be made available to the iSCSI initiator.
9. Format and partition the ZVol from the iSCSI Initiator
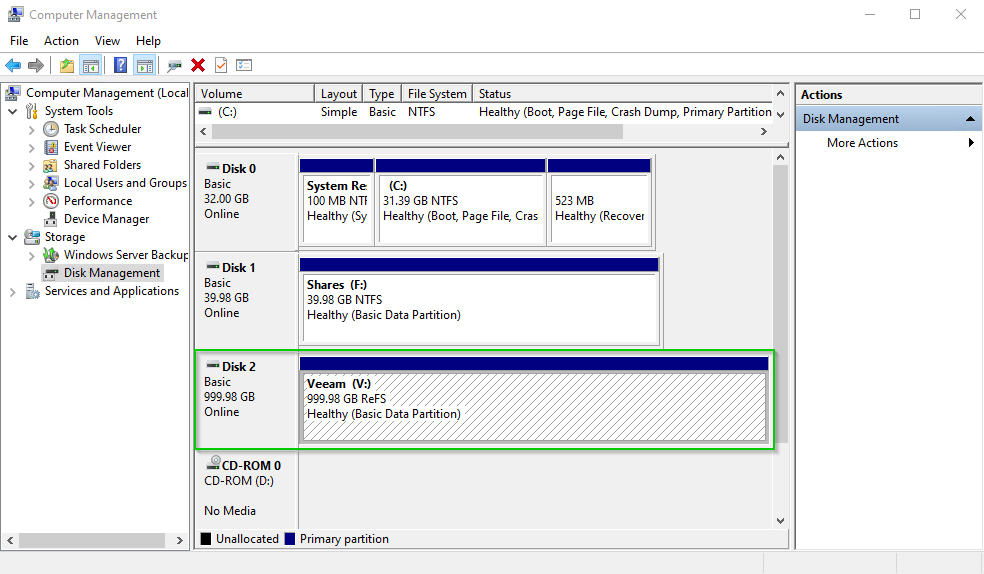
- Open Computer Management and click on “Storage” in the left-hand menu and click “Disk Management.”
-
The new disk needs to be brought online and initialized before we can format and partition it. Find the new disk, then right-click on the Disk name, for example Disk 2, where it says “Offline.” Select “Online” to activate the disk.
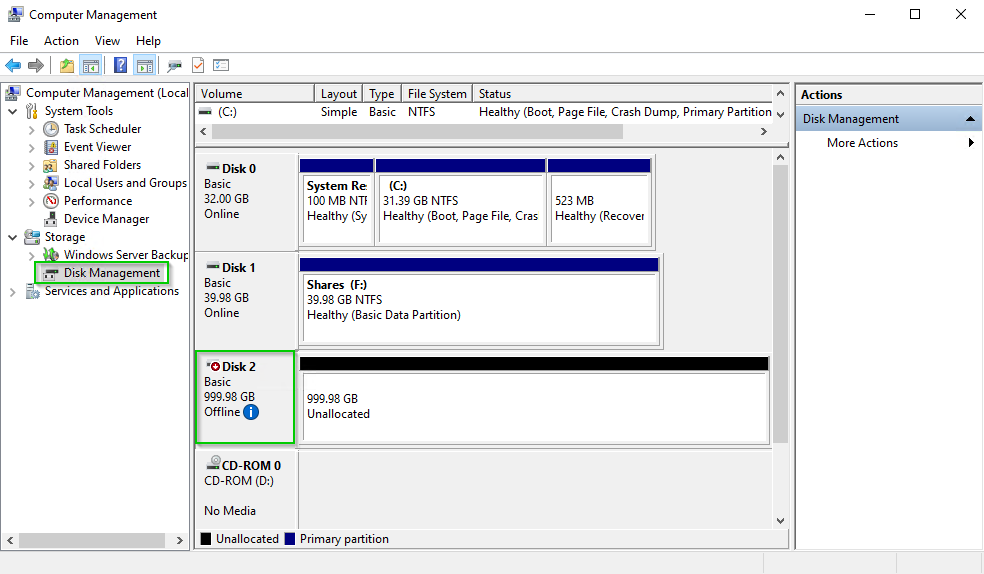
- Right click on the disk name again, and select “Initialize Disk.”
- Choose the partition style. The options are MBR (Master Boot Record), typically used for legacy operating systems, and GPT (GUID Partition Table), which is more modern. In this example, select GPT then click OK.
-
Now that the disk is online and initialized, right click on the Unalocated storage space and select “New Simple Volume.”
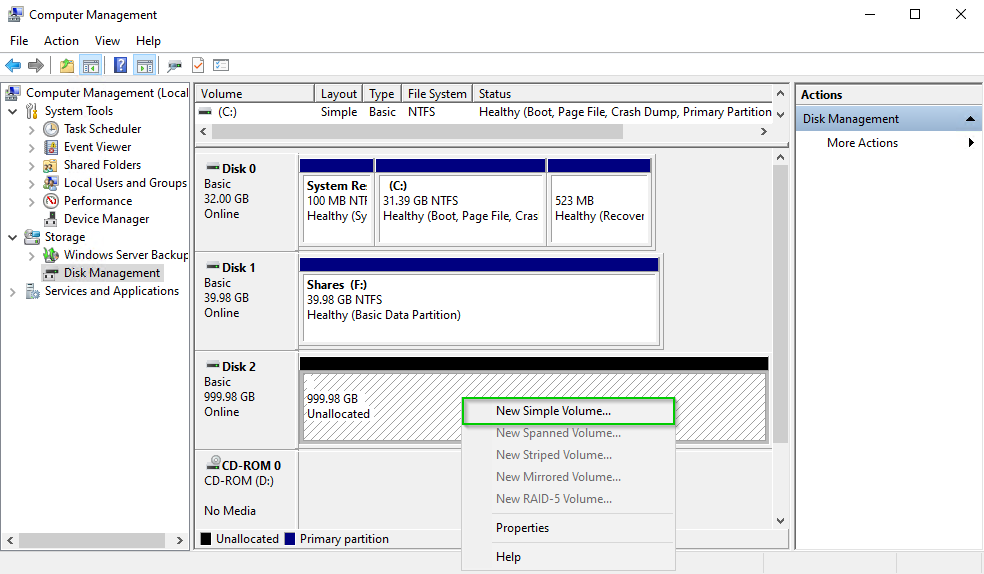
- The “New Simple Volume” wizard will pop up. Click “Next.”
- Specify the volume size (in this example, it will be the full size of the volume, which is the default value). Click “Next.”
- Assign a drive letter to the volume. In this instance, the drive letter “V” will be assigned as this will be utilized as a Veeam backup repository volume. Click “Next.”
-
Select the file system type, for example, NTFS or ReFS. For this example, ReFS will be selected, as this is preferred for Veeam backups. Retain the default allocation unit size. Assign a name to the volume. Click “Next.”
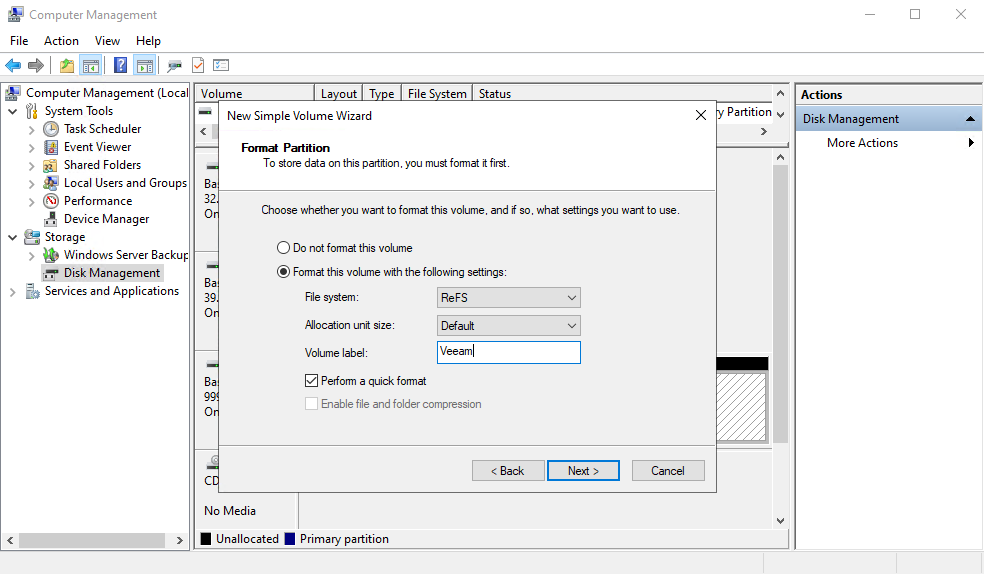
- Lastly, click “Finish” to create the new volume.
