Setting up a new Domain Controller for Windows 2022
Last Updated: March 20, 2024
Introduction –
In this blog post, we will go through the step-by-step process of setting up a new domain controller for Windows 2022. We will also cover best practices, things to avoid, and a command-line argument section at the end.
A domain controller is a server that manages network security, authentication, and authorization services for an organization. By setting up a domain controller, you can ensure that users and computers on your network are secure and properly authenticated.
Diving deeper into Windows Server 2022 can significantly amplify your setup.
Recommended hardware
When setting up a Windows Server 2022 Domain Controller, consider the following hardware recommendations:
- Processor: 1.4 GHz 64-bit, compatible with x64 instruction set.
- RAM: 2GB for Server with Desktop Experience.
- Storage: At least 128GB, but 256GB+ of space is reccomended. For ensuring your domain controller operates at peak efficiency, the choice of storage is critical. High-performance SSDs, such as the Samsung 870 EVO SSD or the Samsung 990 PRO SSD, offer reliability and swift data access crucial for seamless operations.
For detailed hardware specifications, visit Microsoft’s hardware requirements page.
Step-by-step process
Step 1: Install Windows Server 2022
The first step in setting up a new domain controller is to install Windows Server 2022 on the server that will act as the domain controller. Follow these steps to do so:
- Insert the Windows Server 2022 installation media into the server’s DVD drive or USB port.
- Boot the server from the installation media.
- Follow the on-screen instructions to install Windows Server 2022.
Step 2: Setting up the network adapter (TCP/IPv4 and DNS)
When setting up a domain controller, configuring the network adapter and DNS settings is a critical step. Here’s how you can set up the domain controller network adapter and DNS fields:
- Open the “Network Connections” control panel on your Windows Server 2022 domain controller.
- Locate the network adapter that will be used for the domain controller and right-click on it. Select “Properties” from the context menu.
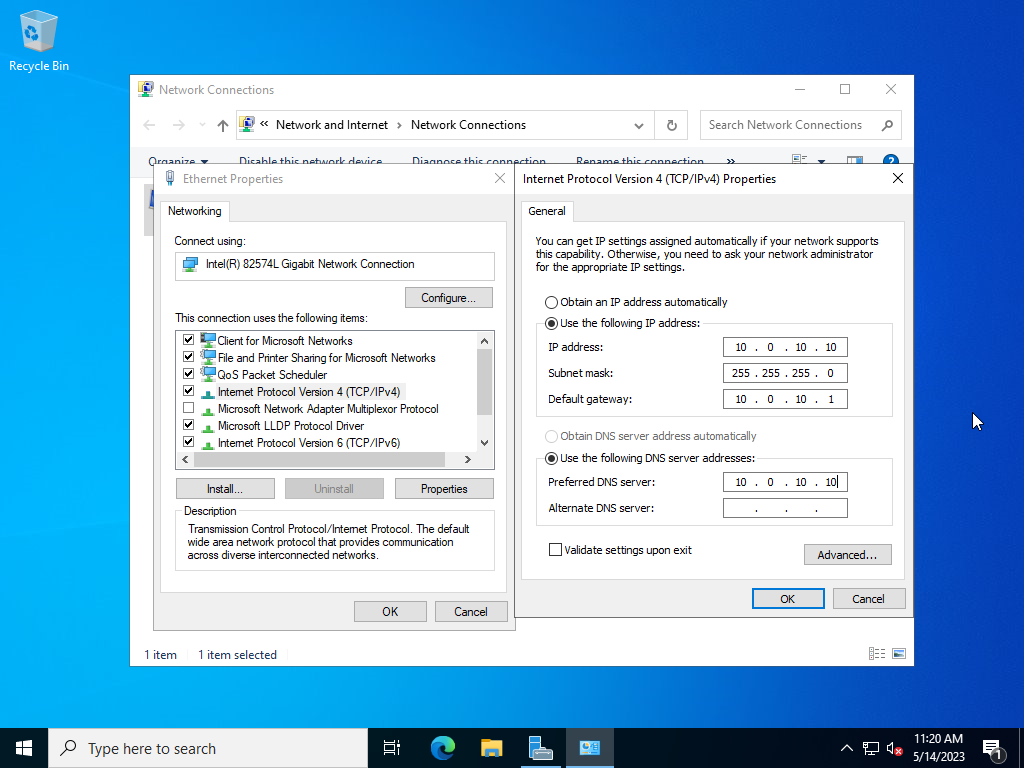
- In the “Properties” window, select “Internet Protocol Version 4 (TCP/IPv4)” and click the “Properties” button.
- In the “Internet Protocol Version 4 (TCP/IPv4) Properties” window, configure the following settings:
- Select the “Use the following IP address” option.
- Enter the IP address for the domain controller. This should be a static IP address that is reserved for the domain controller.
- Enter the subnet mask for the network that the domain controller will be connected to.
- Enter the default gateway for the network that the domain controller will be connected to.
- Next, click the “Use the following DNS server addresses” option and enter the IP address of the domain controller itself as the preferred DNS server. This ensures that the domain controller will use itself as the primary DNS server.
- For the alternate DNS server, you can either leave it blank or enter the IP address of another DNS server on your network.
It’s important to note that when configuring the DNS fields for a domain controller, you should avoid using external DNS servers such as those provided by your ISP. This is because domain controllers need to use DNS to locate Active Directory resources, and external DNS servers may not have the correct information or security settings.
Instead, it’s best practice to use internal DNS servers that are part of your Active Directory domain. You should also ensure that the DNS zones for your domain are properly configured to allow for proper name resolution and Active Directory functionality.
By setting up the domain controller network adapter and DNS fields correctly, you can ensure that your domain controller is properly configured for network connectivity and Active Directory functionality.
Step 3: Set the hostname of the server
Before installing Active Directory Domain Services (ADDS) and promoting a Windows Server 2022 to a domain controller, it’s important to set the hostname of the server to a name that reflects its role as a domain controller. Here’s how to set the hostname:
- Log in to the server with administrative privileges.
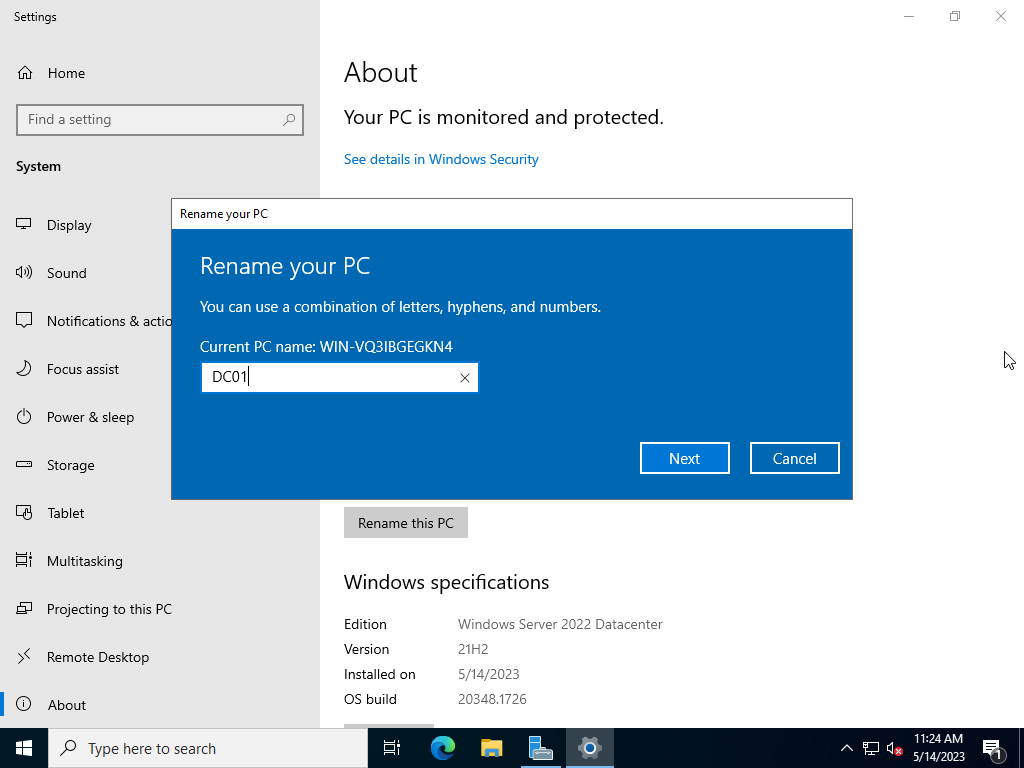
- Open the “System Properties” control panel. You can do this by right-clicking on the “This PC” icon on the desktop or in File Explorer and selecting “Properties”.
- In the “System Properties” window, click on the “Change” button next to the “Computer name” field.
- In the “Computer Name/Domain Changes” window, click on the “Change” button next to the “Computer name” field.
- Enter a hostname that reflects the role of the server as a domain controller. For example, you could use something like “DC1” or “AD1” as the hostname.
- Click the “OK” button and then the “Close” button to apply the changes and close the windows.
- You will be prompted to restart the server to apply the changes. Click “OK” to restart the server.
It’s important to choose a hostname that reflects the role of the server as a domain controller to ensure that it’s easily identifiable and distinguishable from other servers on the network. For example, setting your DC hostname to something like “DC01,” “svrdc1,” “SVR2022DC,” “serverdc1,” etc… This will help ensure that the server is properly configured and used for its intended purpose.
By setting the hostname before installing ADDS or promoting the server to a domain controller, you can ensure that the server is properly configured for its role and that its hostname is easily identifiable on the network.
Step 3: Install Active Directory Domain Services
The next step is to install Active Directory Domain Services (AD DS) on the server. This will allow the server to act as a domain controller. Follow these steps to install AD DS:
- Open Server Manager by clicking the Server Manager icon on the taskbar.
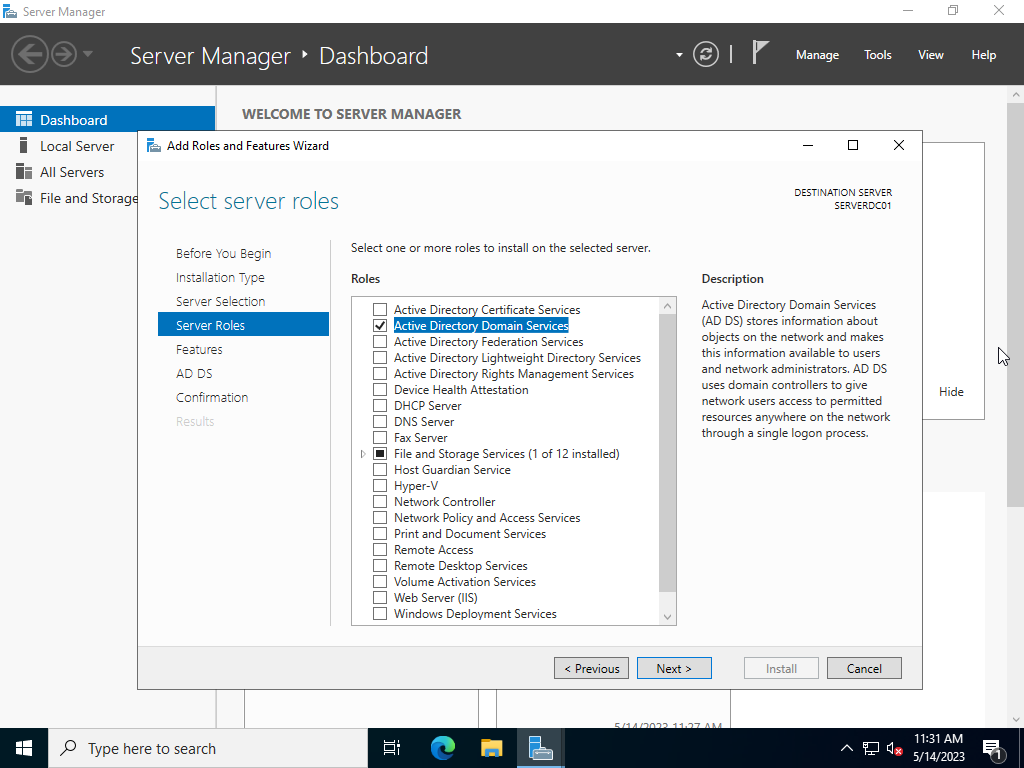
- In Server Manager, click on “Manage” > “Add Roles and Features.”
- Click “Next” until you reach the “Server Roles” screen.
- Select “Active Directory Domain Services” and click “Next.”
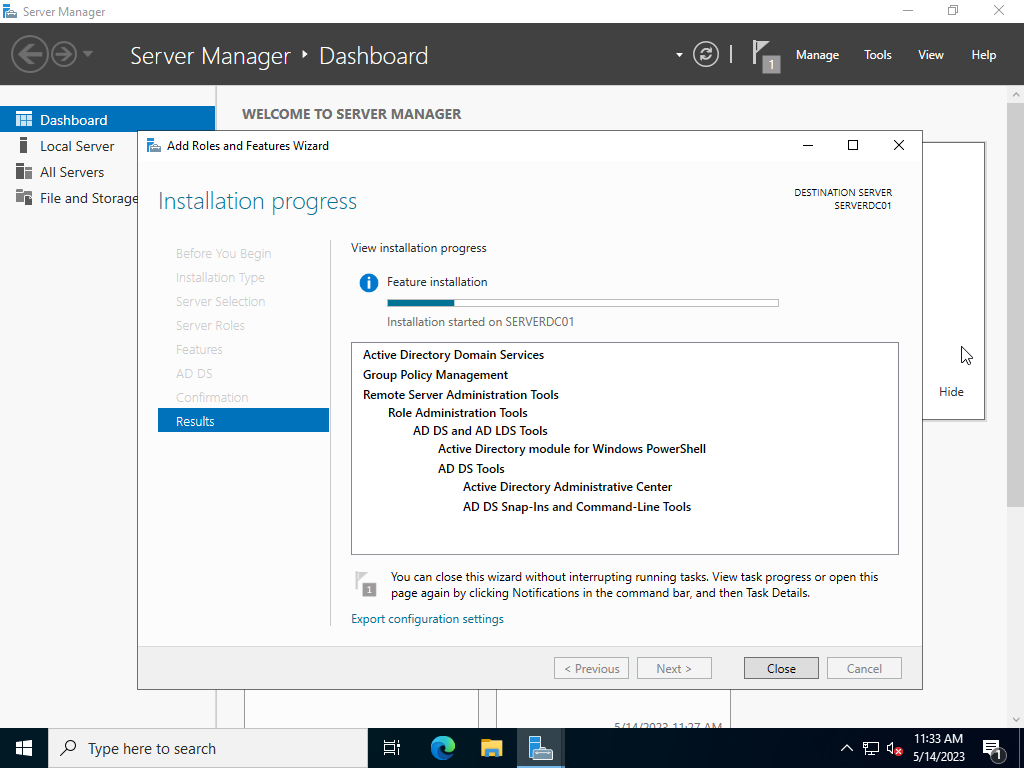
- Follow the on-screen instructions to complete the installation.
Step 4: Promote the server to a Domain Controller
Once AD DS is installed, you can promote the server to a domain controller. Follow these steps to do so:
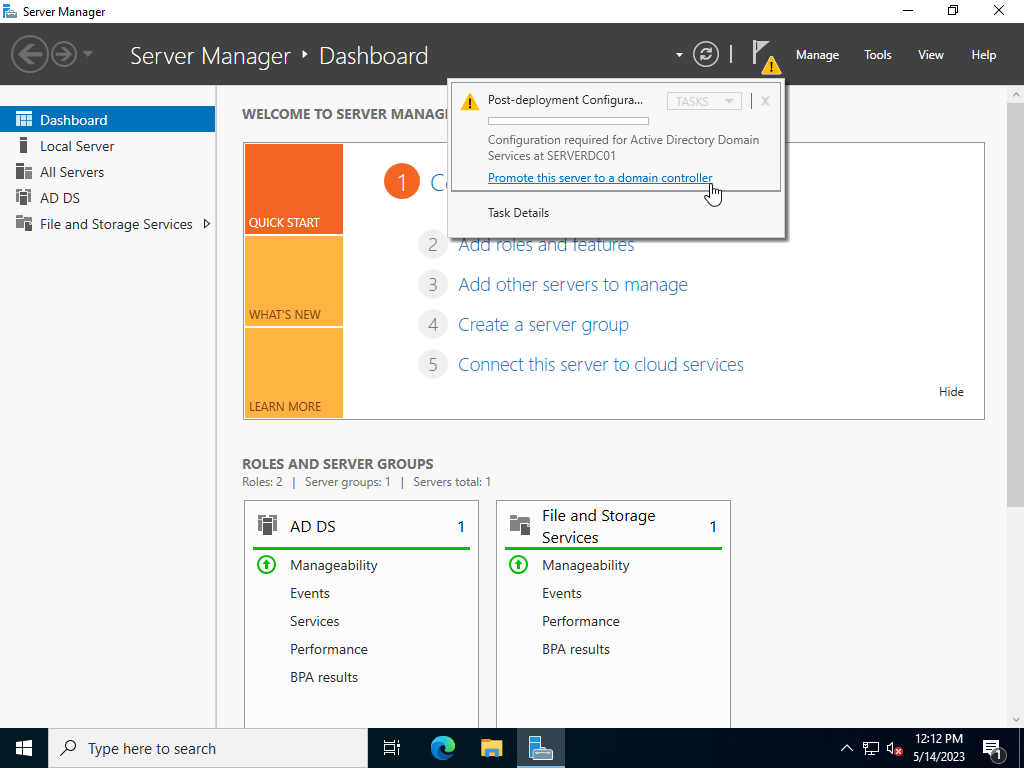
- Open Server Manager and click on “Promote this server to a domain controller.”
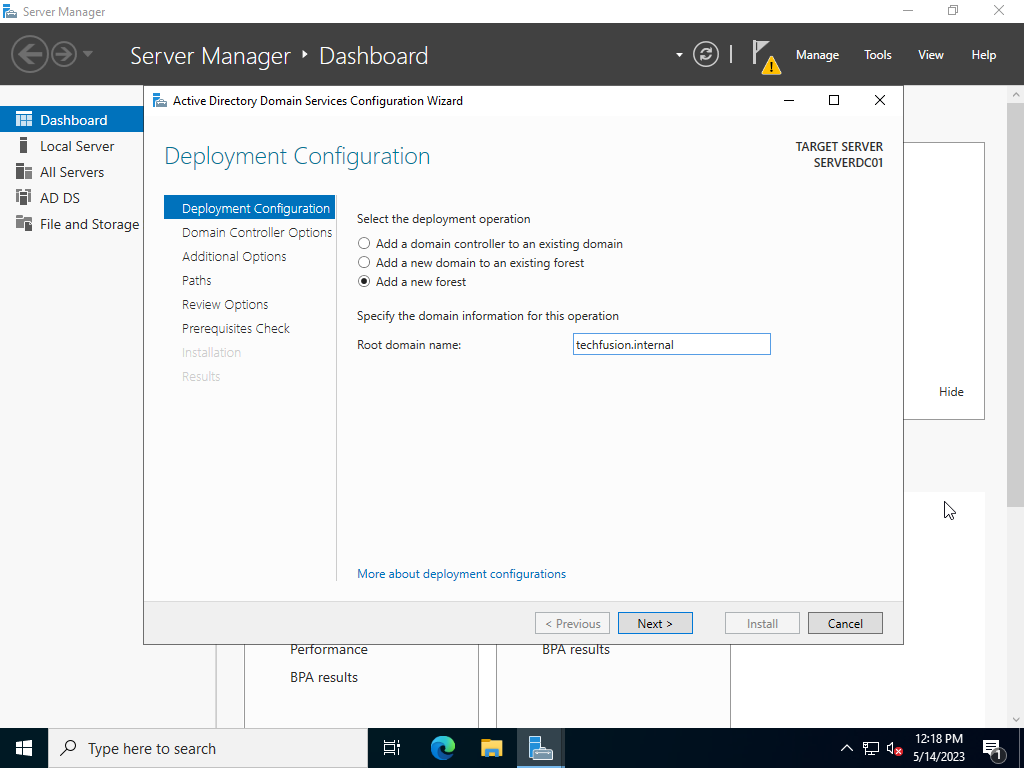
- In the “Deployment Configuration” screen, select “Add a new forest” and enter a root domain name. See notes at the end of this section for tips on selecting a proper domain name.
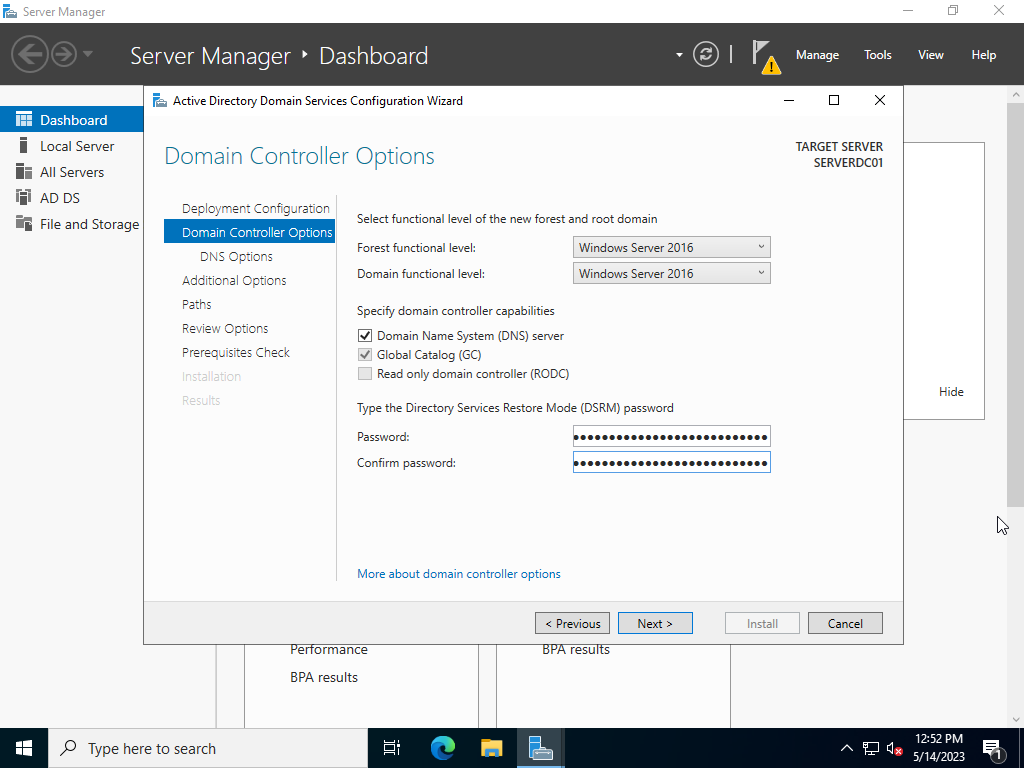
- In the “Domain Controller Options” screen, select the appropriate options for your organization.
- In the “DNS Options” screen, select “Next >”
- Follow the on-screen instructions to complete the promotion process.
- Note: It could be useful to select “View Script” and save it for later during the “Review Options” page, to automate the deployment of future DC’s.
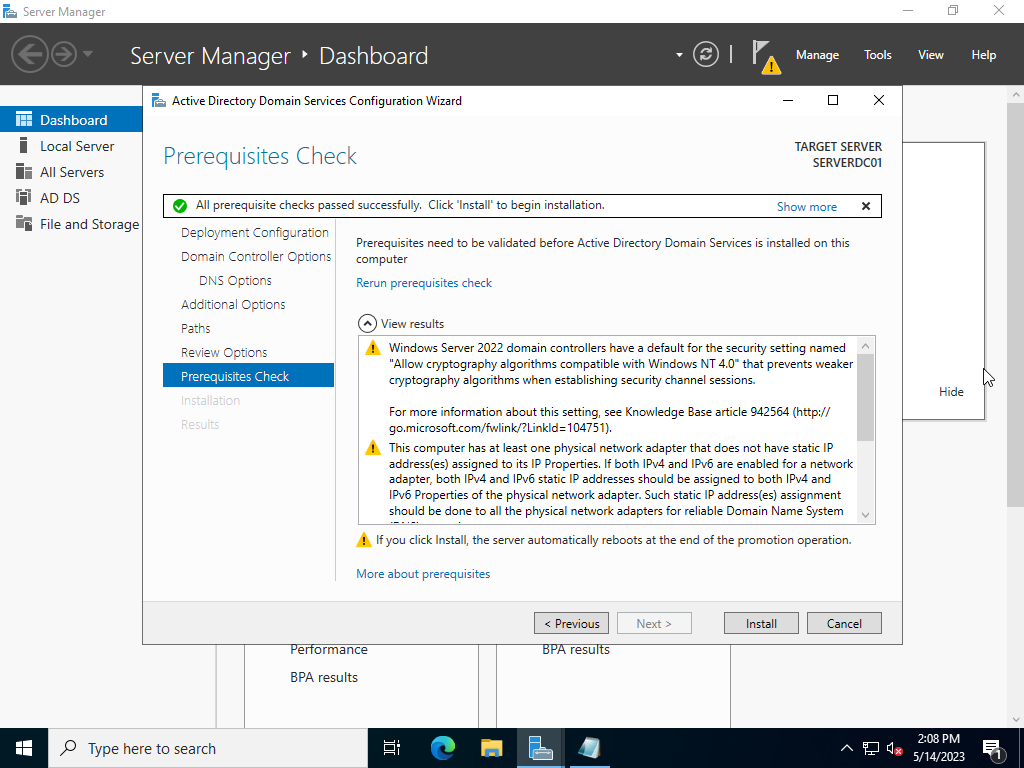
- The configuration wizard will display a Prerequisites page. Review the results then select “Install” to begin promiting the server to a Domain Controller.
Best practices
Here are some best practices to follow when setting up a new domain controller:
- One option is to use a subdomain of your organization’s registered domain name instead of using .local. This will avoid potential conflicts with Bonjour/mDNS, as well as provide better compatibility with new and future technology.
- Use .internal or .corp instead of .local. These are considered safe options. This will prevent split-brain DNS.
- Depending on how you want to manage your organization, you might want to actually use split-brain DNS to prevent DNS name resolution issues and ensure that internal and external resources are resolved correctly.
Post-deployment Tips
Change the DNS settings of the Domain Controller
Change the DNS settings to use the domain controller’s own IP address instead of using the loopback address 127.0.0.1. This can help with performance, replication, and security.
Configure the secondary DNS server for domain-joined Computers
If you want to configure internet access for domain-joined computers that are using the domain controller as their DNS server, you can set the secondary DNS server to be a public DNS server such as 1.1.1.1 or 8.8.8.8.
- Log in to the domain controller with administrative privileges.
- Open the DNS Manager console by clicking on Start > Administrative Tools > DNS.
- In the DNS Manager console, right-click on the server name and select Properties.
- In the Server Properties window, click on the Forwarders tab.
- Click on the Edit button to add the IP address of the public DNS server you want to use as the secondary DNS server.
- In the Edit Forwarders dialog box, click on the New button and enter the IP address of the public DNS server (e.g. 1.1.1.1 or 8.8.8.8).
- Click on OK to close the Edit Forwarders dialog box.
- Click on OK to close the Server Properties window.
Limit internet access on Domain Controllers
It is generally recommended to limit internet access on the domain controller to reduce the attack surface and improve security. However, in some cases, the domain controller may need to have internet access for certain administrative tasks or updates.
There are other ways to restrict internet access on a domain controller that may be more effective or appropriate depending on your environment and requirements. Here are a few additional options:
- If you want to block internet access on the domain controller, one way to do this is to configure a firewall rule on the domain controller that blocks outbound traffic to the internet. This can be done using the built-in Windows Firewall.
- Use a separate network interface: You can configure the domain controller to use a separate network interface for internet access, which can be physically isolated from the internal network. This can be a more secure option as it prevents any potential internet-based attacks from reaching the domain controller. However, this may require additional hardware or network configuration.
- Use a web proxy server: You can configure the domain controller to use a web proxy server for internet access, which can provide granular control over internet access and allow you to monitor and filter traffic. This can be done using group policy or by configuring the proxy settings in the Internet Options control panel. However, this may require additional infrastructure and maintenance.
- Use a third-party firewall solution: You can use a third-party firewall solution, such as a hardware firewall or software firewall, to block internet access on the domain controller. This can provide more advanced features and better protection than the built-in Windows Firewall. However, this may require additional licensing and maintenance.
Command-line arguments
Here are some useful command-line arguments for managing Active Directory:
dcdiag- This command checks the domain controller’s health and performs tests to ensure that it is functioning correctly.netdom query fsmo- This command displays information about the domain controller’s Flexible Single Master Operations (FSMO) roles.repadmin /showrepl- This command displays replication status between domain controllers.ntdsutil- This command-line tool is used for managing Active Directory databases and related components.
Conclusion
Setting up a new domain controller for Windows 2022 requires a series of steps to be followed, starting with installing Windows Server 2022, installing Active Directory Domain Services, and promoting the server to a domain controller.
By following these steps and best practices, you can set up a new domain controller for Windows 2022 that will help ensure network security and authentication for your organization.

